Saturday, June 30, 2012

Miss You

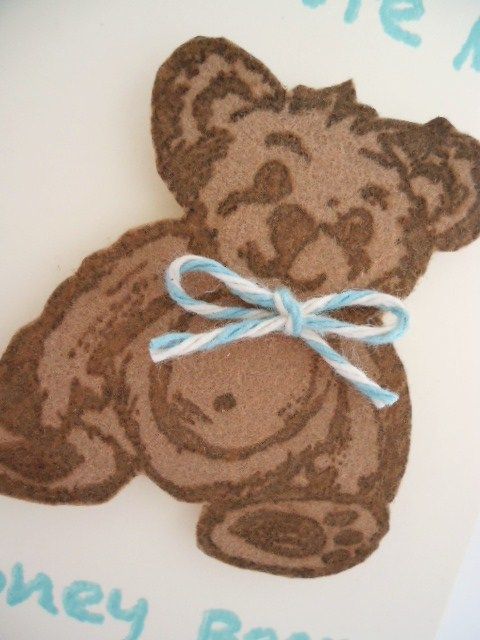
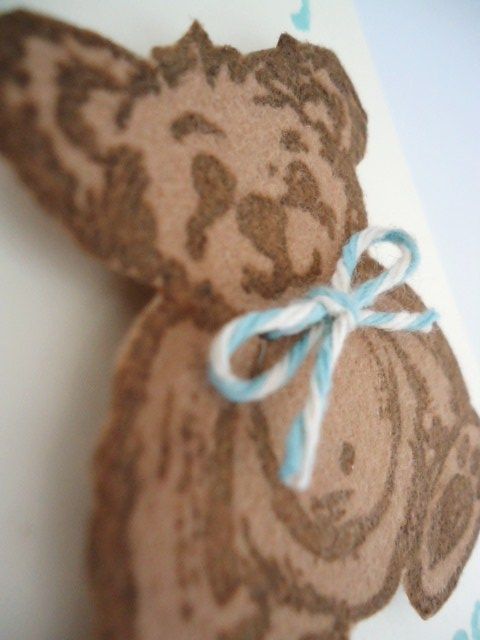
I love how versatile and adorable this little bear stamp is from the gel-a-tins 'Honey Bear' clear stamp set. I made this 'Miss You' card for this weeks project.

Image

Products Used

gel-a-tins 'Honey Bear' clear stamp set
Kanban Paper (Patterned)
American Craft Speciality Paper (Blue)
Brown Whispers Ink Pad
We R Memory Keepers Grossgrain Ribbon
We R Memory Keepers Tassle Ribbon
Xyron 9" Creative Station
Xyron 150 X
Xyron Mega Runner
Blue Chipboard Shapes
Blue Wire
Fiskars Mini Scallop Scissors
Foam Pads
A5 White Card


How It's Done

Cut a piece of the Blue American Crafts Speciality Paper to fit the card and trim along the top using the Fiskars Scallop Scissors. Run through the Xyron 5" Creative Station and place on the front of the card.

Cut a piece of Kanban Patterned Paper slightly smaller, run thought the Xyron 9" creative Station and and layer over the blue paper. Cut the Ribbon to length and run through the Xyron 150 X and place along the top of the card.

Image

Using the 'Miss You' sentiment and the 'Honey Bear', stamp the images on the Kanban paper to match the main background. Cut out and layer onto pieces of the blue American Crafts Speciality Paper. Trim and layer together on too of the card using foam pads.

Image

Arrange the wire, chipboard and ribbon under the sentiment.

Image

And that's it.

To buy this amazing stamp set please go to http://gelatinstamps.com/ .
For more ideas and inspiration you can visit the gel-a-tins blog at http://gelatinstamps.blogspot.ie/ and on Facebook at https://www.facebook.com/gelatinstamps .

Friday, June 29, 2012

Sweet as honey!

Hello, everyone! Thank you for stopping by Gel-a-tins today! Can you believe that June is almost over! Eeeekkk were has the month gone!

Today I am going to share with you a CAS (Clean and Simple) card with you. In the Honey Bear Set, there is this cute beehive and tiny bees. (Too cute!) I designed this simple card that would be perfect to send to someone who is feeling under the weather.

Here it is:

Image

And a closer look:

Image

Don't you love the yellow and black color combo! I think it is perfect for the bee stamps! And what better paper to use, right?!

Gel-a-tins stamps are perfect for CAS cards. There are stamps for all occasions! Please stop by the shop to see the wide selection!

Thank you for stopping by! Have a great day!

Jessi

Thursday, June 28, 2012

Rainbow Chevron-Tastic!

Hey gelly fans!  It's Jessica here again with a card for you.  I made this one with the Chevron-Tastic stamp set and the Put a Cap on it set.  I think it's a great, happy card that I could use just to say hello, or for a birthday or just about any other occasion.


I combined the stamps with a rainbow of ink colors, some Canvas Corp paper that I cut with a Spellbinder's die, some washi tape, buttons and twine.

Quick and easy and fun too!

Supplies Used:
Adhesive: Xyron
Inks: Stampin Up, Staz-On
Buttons: Autumn Leaves and Buttons Galore and More
Twine: The Twinery
Washi Tape: Gauche Alchemy
Die: Spellbinder's
Paper: Canvas Corp

Wednesday, June 27, 2012

Follow with Love Knots

Welcome to the first full week of summer! One of my favorite summer activities with my family is going to the Children's Garden. I am sharing a layout I created using the Love Knots set about a recent trip to the gardens.

Follow
Image

Supplies Used:
Love Knots stamp - gel-a-tins
gcd Melody Ross pattern paper
border sticker - Sassafras Lass
stickers - Echo Park
Thickers - American Crafts
stick pins - Maya Road
tags and twine unknown stash

For this layout I wanted to use manilla tags to add a little embellishment, but they were too plain on their own. Adding a background stamps adds a little bit extra emphasis to the tags while still keeping the focus on the photo.

Tuesday, June 26, 2012

Unbeleafable Dream

Hi dear girls!
This week I have for you sweet card with great sign-Dream!We all shoul dream!And all our derams will come true)))My deram for today is vacation)))Vacation at the our cottage ispired me for new card)))

Image

Image

How I made. Again all is very easy :)Many layers of Pion Designs Paper and lace.I stamped a grass with Dovecraft ink and beautiful stamp from gel-a-tins set "Unbeleafable". Than I decored tag with brads and twine thread. Last step was to crop two sweet butterflies and make few dots with glossy accents.Thats all:)

Hope you've enjoyed this card!

PRODUCTS USED
gel-a-tins "Unbeleafable" Clear Stamp Set
Pion Designs paper
Lace
Martha Stewart Punch Doily Lace
Glossy Accents Ranger
Brads Echo Park

Have a great crafting!
Tanya P.
www.diaryofcards.blogspot.com

Monday, June 25, 2012

Sweet Cakes and banners!

Hello! It's Anita from http://craftygrldesigns.blogspot.com/ With summer finally here I had to play with fun bright colors so I decided to play with the Sweet Cakes Stamp set!

Image

I stamped the icing in a bright pink and stamped the cup in brown! I embossed the kraft cardstock in a modern hexagon! The fun papers add a lot and compliment the cupcake! I couldn't resist making a banner! For the banner I tucked the ends underneath the kraft and than tied the twine bows on each edge! Hope you enjoyed my bright and fun card today!

Products used:

Sweet Cakes by Gel a Tins
this and that papers by echo park
Bubble gum pink and cup o java ink by Hero Arts
Bossabilities embossing folder by Spellbinders
Twine by the twinery
cardstock by bazzill

Friday, June 22, 2012

Monkey-ing Around!

Hello, everyone! Yep, you guessed it. I just can't get enough of this cute little monkey from the Safari Friends collection. My previous card had him saying "hi!" This time, he is here to say, "thank you." And...I also turned him into a sock monkey. He is just as fun with this new identity.
Image

Image

To create the sock monkey look, simply stamp the image onto cream and light brown cardstock. Cut out the pieces and reassemble. I added the pointed football shape over his mouth in red. This small touch makes all the difference.

I added him to a 4x4 card. Start with a red card base. Punch a square out of the front. Add a piece of white cardstock to the inside. Adhere the monkey with a foam adhesive square, making sure he is visible through the punch out. Hand write (or stamp) a sentiment on the inside.

I added a button brad and a piece of twine for a fun closure. Simply adhere one end of the twine behind the white cardstock. Wrap the other end around the button brad. For additional detail, use a black marker with a thin point and outline the front and inside of the card.

Thank you for stopping by the blog today. I hope you try making this cute little guy. He has lots to say, that is for sure!
-Kim F.

Gel-a-tins:
Safari Friends

Other supplies:
Cardstock by Prism
Distress Ink by Tim Holtz
Twine by Martha Stewart
Black Marker by ZIG Memory System
Button Brad (source unknown)
Square Punch by Punch Bunch
Adhesive Foam Squares

Thursday, June 21, 2012

It's a Boy!

I framed this card using the gel-a-tins 'Safari Friends' corner stamp to frame this card. I made this card in blue but would work just as well in pink for a girl. To buy these cute stamps and many more visit http://gelatinstamps.com/

Image

Products Used

gel-a-tins 'Safari friends' Clear Stamps
Xyron 5" Creative Station
Xyron Mega Runner
Trimcraft Up Up and Away Stack
docrafts Papermania Heartwarmers 'Baby Boy' Toppers
docrafts Papermania White Embossing Powders
White Satin Ribbon
Foam Pads
Acrylic baby soother charm
A5 white Card

How It's Made

Cut two contrasting pieces of paper from the Up Up and Away Stack 145mm x 110mm. Run through the Xyron 5" Creative Station and position on the front of the card. Using the 'Safari Friends' corner stamp, embossing pad and the white embossing powder, stamp the four corners of the card.

Image

Run the Xyron mega Runner across the middle of the card and apply a lenght of satin ribbon, pleating as you go. Loop the acrylic baby soother and add to the front.

Image

Place a second piece of satin ribbon across the top to secure and finally another thinner piece of satin ribbon. For the topper cut a matching piece of paper in an oval and use the white embossing powder around the edges. Run the topper through the Xyron 5" Creative Station and layer together.

Image

Secure to the front of the card using foam pads.

Image

And that's it.

For more fabulous ideas and gorgeous stamps please visit http://gelatinstamps.com/ or the gel-a-tins blog at http://gelatinstamps.blogspot.ie/ and of course facebook at https://www.facebook.com/#!/gelatinstamps

Wednesday, June 20, 2012

Chevron and bamboo beads!

Before I show the project, please let me say a quick thank you for stopping by Gel-a-tins today! I hope you have been enjoying the latest DT projects!

Today, I decided to go away from my comfort zone...far away! I usually make cards, but today I took a stab at making a jewelry piece. I kept coming across some bamboo beads on clearance at a local craft store. A few days ago I finally decided to buy them. Unsure of what I was going to do, I had them sitting on my counter for a few days.

I started to play around with the Cheveron-tastic stamp set and the idea finally clicked. I was going to attempt stamping on the beads.

Here is the final outcome: (after going through several trial-runs)

Image

The first step I completed was to lightly sandpaper the front of the bead. Once the polish was off, I stamped the image using permanent stamping ink. The first image was stamped in the middle and the remaining stamps went from there.

To finish of the piece I added a few beads to each side of the pendant. Voila! Finished!

Image

Gel-a-tins Stamps:

Chevron-tastic


Other Supplies:
Starzon Ink Pad - Black
Bamboo Bead Pendant
Misc. Beads
Jewerly Rope


Thank you for stopping by today! I hope you find time to create with Gel-a-tins today! If you do, please share your projects with us!


Jessi

Monday, June 18, 2012

Monday Sweet Cakes!

Hello! I hope that you are having a great day! It's Anita from craftygrldesigns.blogspot.com and I have a pretty card to share with you today! I am using the fun set Sweet Cakes!

Image

I love sideviews:

Image

I used some fun polka dot feminine paper and based my colors off of it. I paper pieced the frosting and used hem tape for the ribbon! I colored the hem tape with my ink pad! I couldn't find room for the sentiment so I stamped it on the tag and tied it on with the twine and a button! :> I very much enjoyed making this card!

Hope you enjoyed my card and are inspired by it! Until next time I hope your ink pads are never dry!

Supplies used:

Sweet Cakes by Gel a Tins
PP by My Mind's Eye
Cardstock by Bazzill
Tag by Maya Road
Die, button by Papertrey Ink
Ink Chocolate Chip by Stampin Up
Twine by the Twinery

Sunday, June 17, 2012

Happy Father's Day!

We here at gel-a-tins just want to wish our fans in the U.S. a very Happy Father's Day!  We hope you're having a wonderful Sunday with the people you love!


This is a Father's Day card that I made with the Mustache Mania set.  I've been calling it the Mustache Hall of Fame :)

Have a great day and we'll see you tomorrow with more beautiful projects from our DT!

Supplies Used:
Echo Park pp
Xyron adhesives
American Crafts ribbon
Canvas Corp card blank
Making Memories letter stickers
Tim Holtz distress ink pad
Staz-On brown ink pad

Saturday, June 16, 2012

Have a nice day!

Hello to everyone!
This week end I made a new card with polka dots)
Image
Image
Image

How I made it? Very easy. I stamped a grass with Prima marketing ink and beautiful stamp from gel-a-tins set "Unbeleafable".Then I picked up the paper, made a composition.Than I glued ribbon.Decorated it with ribbon, flowers and marbles. Than punched a butterflies and decorated them my card.Last dots I made with liquid pearls


Hope you've enjoyed this card!

PRODUCTS USED
gel-a-tins "Unbeleafable" Clear Stamp Set
Echo park paper
MME paper
Fabscraps paper
Ribbons
Glossy Accents Ranger
Marbls
Prima Chalk Ink Edger Branch Bark
Ranger Petal Pink Liquid Pearls


Have a great day!
Tanya P.
www.diaryofcards.blogspot.com

Friday, June 15, 2012

Love Knots layout

Hi gel-a-tins fans! The weekend is here. It's going to be our hottest weekend yet in Michigan, so I plan to spend some time enjoying the central air in my craft room and playing with stamps and ink!

I would like to share my latest scrap layout with you.

1 of the Guys

Image

Supplies Used:
gel-a-tins Love Knot stamp
Studio G ink
Paper and quote block - Authentique
black alphas - The Paper Studio
"1"- pink paislee
Tim Holtz chit chat stickers
October Afternoon journaling spots

My favorite thing about the Love Knot stamp is how versatile it is. I stamped onto a kraft circle and used it as an embellishment to anchor the journaling spot and quote die cut.

Image

I hope everyone enjoys their weekend and has a chance to play with stamps and ink!

Thursday, June 14, 2012

What's Up?

Hello Everyone, Nina here to share a simple card I made using Traffic Signs Stamp Set.

Image

Traffic Signs is a very clean and stylish masculine set for making cards for the men in your life. I love the font in this set and cannot help but try to spell something out with them. So this is what I came up with:
Image

The only trick was how to stamp the images straight:) A pencil and a ruler came to rescue:) I counted the letters and started with the "S" in the middle so my sentiment can stay in the center:) the little "," is actually the dot from the "!" :) Easy, right?

I hope that you are inspired to try spelling something out yourself. Happy Crafting!

Wednesday, June 13, 2012

Lions and Tigers and...

...oh my! Isn't the Safari Friends set just too cute?! It is perfect to create some decorations for a little boy's birthday party.

Image

I created this circus tent from cut paper. I found an image through an online search to use for inspiration.
The first step is to cut the tent shape from white cardstock. Trace that onto a piece of red cardstock. Cut into stripes.
Cut a piece of black cardstock into the shape of a tall, skinny triangle. When adhered to the center stripe along with two smaller yellow triangles, it will look like the tent flaps are slightly open. Add a banner of triangle flags, and a waving flag at the peak of the roof and your big top is complete.

Stamp the lion and tiger onto orange, yellow, and off-white cardstock. Cut out the pieces and adhere together. I love to use stamps for a paper-pieced look.

Image

Add small pieces of folded cardstock to the back of all finished items to make them stand up. An adorable idea would be to place the circus tent at the top of a cupcake carousel display. And then randomly place lions and tigers amongst the cupcakes...or use them as cupcake toppers. Simply adhere them to toothpicks.

I hope you enjoyed this project. Be sure to stop by each day to see what all of the Gelatina's have in store!
-Kim F.

Gel-a-tins:
Safari Friends Collection

Other Supplies:
Cardstock by Prism
Distress Ink by Tim Holtz in Black Soot

Tuesday, June 12, 2012

Happy Fathers Day / Happy Birthday Dad Card

Using the adorable Teddy from the gel-a-tins 'Honey Bear' Clear stamp set I made this card for Fathers Day or it could be used for a Birthday.

Image

Products Used

gel-a-tins 'Honey Bear' Stamp Set
Dovecraft 'Masculine' by Jayne Bentley 6x6 Designer Paper Pack
Polka dot Ribbon
Brown Satin Ribbon
Papermania 'Birdsong' Alphabet Letters
Xyron Mega Runner
Mini Foam Pads
Vintage Brown Buttons
StazOn Black Ink Pad
A5 Blank Card

How it's Made

Cut the contrasting papers so that they fill the card 50/50 and stick using the Xyron Mega Runner. Cut the Ribbon and adhere to the front of the card in vertical strips.

Image

Stick a piece of matching paper along the top to cover the top of the ribbon. Stamp the 'Honey Bear' image onto paper and stick to the right hand side of the card.

Image

Using the letters on matching paper make the tag 'dad' and using the Xyron Mega Runner apply to the bottom right of the card.

Image

Using the foam pads apply the buttons and there you have it!

Image

This card could be used for either Fathers Day or a Birthday


Sharon

Monday, June 11, 2012

A cuddly bear

Thanks for stopping by Gel-a-tins today! I hope you find our blog full on inspiring projects and would love for you to share your Gel-a-tins creations with us!


Hello, everyone! It's Jessi. When I saw the Bear in the "Honey Bear" set, I knew I wanted to some how use flocking powder. After several attempts (have to admit...this was my first time using it), I finally was able to figure out how to make the bear image work.


Here is my CAS (best kind of cards out there *my opinion*):

Image

Here is a close-up of the cute bear:

Image

Can you tell there is flocking powder? No really sure on how to take a picture to showcase the texture?

Image

To start of the flocking technique, I use a ivory cardstock and rolled a gluestick over an area the size of the stamp. Quickly taking the flocking powder and pressing it onto the glue. Allowing the powder to dry, I then stamped the image with brown ink. Once the ink was dried, the image was cut-out. Using a small hole punch, I punched 2 holes around the bear's neck and added the twine bow.

To complete the card, I attached the bear to the corner and added the sentiment around the bear.


Once again, thank you for stopping by today!


Supplies:

Honey Bear Stamp Set


Other Supplies:
Studio G Flocking Powder
Trendy Twine - Sky Blue
Paper Studio- Baby Blue & Brown Ink
Popdots

Saturday, June 9, 2012

Chevron star card by Taheerah

Hey everyone! Thanks for stopping by the Gel-à-Tins blog again - I hope you're enjoying all the amazing projects the girls are posting!

I'm back today with a masculine card using Chevron-Tastic. Chevrons are so versatile that they work for both male and female recipients - I love that!

I made a fun discovery whilst playing around with my set - the large solid chevron fits perfectly between the double chevron stamp! That just opened up a whole world of extra possibilities for me!!

So out of that discovery came this card:

Image

Fun, no? Let me tell you how I did it.

Image

I started with a Kraft card base and stamped a chevron pattern in green, brown and kraft, alternating the colours and mixing and matching with the solid chevron. I just love how jazzy it came out!

Image

I then stamped the sentiment in black and added some die-cut stars, stamping some in brown with a concentric star design. The stars were adhered with dimensional glue gel so they really pop off the card at different heights!

Image


Supplies Used:

Gel-à-Tins:
Chevron-Tastic stamp set

Other:
Super Stars stamp set (Papertrey Ink)
Kraft, Dark Chocolate and Simply Chartreuse inks (Papertrey Ink), Versafine Onyx Black ink (Tsukineko)
Kraft cardstock (Papertrey Ink)
Seeing Stars dies (Papertrey Ink)
Pinflair Glue Gel (Olba)

I'd love to know what you think of this little card. Thanks so much for stopping by!!

Friday, June 8, 2012

Safari Friends

Hello! It's Anita from http://craftygrldesigns.blogspot.com/ I hope that your having a great day! I am happy to be here today sharing a card made with the Safari Friends stamp set! With Father's Day just around the corner I thought I would make a masculine card with this set!

Image

I stamped a few of the animals from Safari Friends in brown ink onto kraft cardstock. I colored the animals in lightly with pencils, since I thought it gave it a more masculine feel! I used some pattern paper that I think is quite masculine with it's chevron pattern and colors! I wasn't going to leave the twine over top of the animal panel but when putting it together I liked the way it looked! :>

And that's it for me! :> See you next time!


Supplies:

Safari Friends Gel A Tins Stamp Set

Ink: Cup of Joe by Hero Arts
Bazzill Cardstock
Twinery Caribbean Twine
My Mind's Eye Pattern Paper

Thursday, June 7, 2012

Happy Day!

Hi dear crafters!
Today I want to show you a card.

Image

Image

I stamped a grass with Dovecraft ink and beautiful stamp from gel-a-tins set "Unbeleafable".Than I picked up the paper, made a composition. Than and made a blots with black acrylic ink. Next step was to decor my card with flowers and glossy accents.

Hope you've enjoyed this card!

PRODUCTS USED
gel-a-tins "Unbeleafable" Clear Stamp Set
Webster Pages paper
MME paper
Fabscraps paper
Pion Designs paper
Buttons
Stickers Hambly Studio
Flowers Maya Road
Glossy Accents Ranger


Have a great crafting!
Tanya P.
www.diaryofcards.blogspot.com