Friday, August 31, 2012

More Doodle Flower Love!

Hey there! It's Anita and boy am I ever glad it's Friday! I am so looking forward to this long weekend, sad that it's the last long weekend of summer 
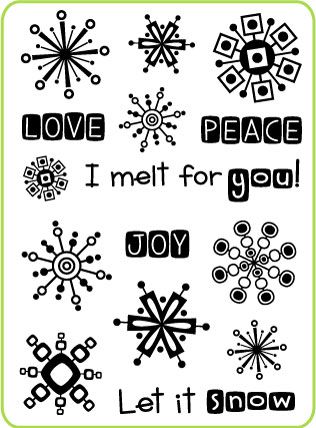
though! Today I have a pretty card using a Gelly Jr Stamp Doodle Flower! It's hard for me not to grab this stamp each time I play with my Gel a Tins stamps as it's my favorite!

Image

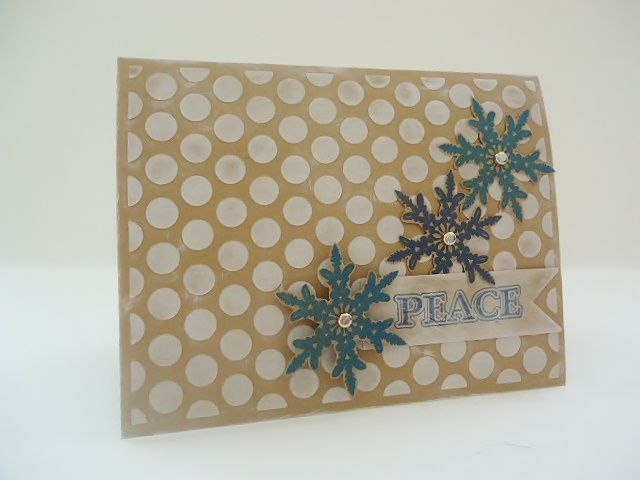
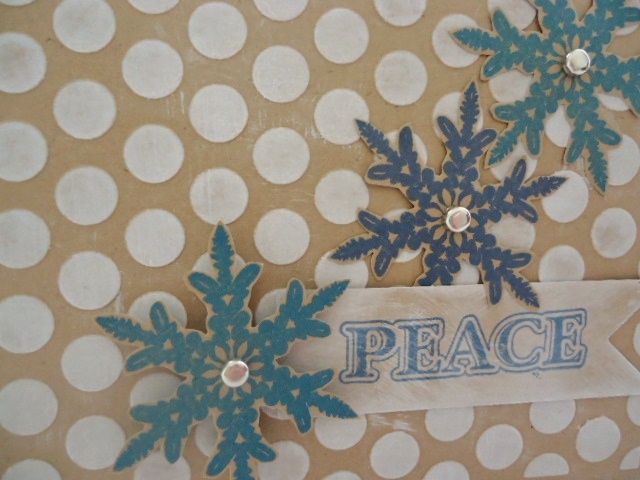
I stamped the background by stamping the doodle flower over and over again, and over stamped the petals a bit. I than heat embossed the doodle flower onto matching cardstock and fussy cut it out, and used a shaped and embossed brown piece of cardstock. I used the I miss you sentiment because I plan on tucking this card into my hubby's bag. This weekend he is going on a guys trip to see his favorite football team play our main rival! :>

Hope you have some great plans for this long weekend! :>

Supplies used:

Doodle Flower Gelly Jr Stamp by Gel a Tins
Ink by Memento
Mat Stack 4 die by Papertrey Ink
Sentiment by Hero Arts
Cardstock by bazill
white embossing by Hero arts

Thursday, August 30, 2012

Thursday Fun!

Hey everyone!  It's Jessica B. here again with a card to share and a challenge blog to introduce you to. 

This week we're sponsoring a prize over at The Play Date Cafe.  They do fab color combo challenges every week.  I love a good color combo for getting the creative juices flowing and I'm sure you do too :)  Here's their combo for next week...


These are such pretty colors and I had a fun time going through my papers and inks and putting together a card.  Check it out!


I used Basic Grey, My Mind's Eye and K & Co. papers, Stampin Up and Distress inks, Twinery twine, Making Memories embellishments and Ranger stickles along with the Butterflies are Free stamp set.

Head on over to The Play Date Cafe and check them out.  I'd love to see one of our fans win a prize!

Speaking of prizes, I'll have the blog hop prize winners posted on Saturday.  Thank you for hopping with us!

Wednesday, August 29, 2012

Happy New Year Card

Hi dear crafters!
Today I have for you new year`s card.

Image

Image

For it I stamped gel-a-tins "winter pine" 3 times. Cropped them.  Toned with Dovecraft ink.
Than I made a composition with paper, chrismas flower and clip.


Hope you've enjoyed this card!

PRODUCTS USED
gel-a-tins "winter pine"
MME paper
Twine
Dovecraft ink
Ranger Distress Ink Pad


Have a great day!
Tanya P.
www.diaryofcards.blogspot.com

Tuesday, August 28, 2012

Joy, Peace, Love

Hello stamper, Nina here with another Christmas card.

Image

I used one of the older sets from Gelatins: Mini Retro Flakes & Sayings

Image

I heat embossed the snowflakes in white on colored card base and hand drew the dashed lines with a white gel pen.

This is also my first Gelatin stamp set. The snowflakes just make my heart skip a beat!

Thank you for stopping by. Happy Crafting!

Monday, August 27, 2012

A Little Note

I would like to share a fun way to use up some of your stash. You can customize these little note cards for many occasions, including a simple thank you for a holiday gift.

Image

Image

I made the card base out of 2 hand cut tags. They are bound together using a strip of patterned paper. (Instead of cutting your own tags, use up that stash of shipping tags you may have on hand.) This card base measures about 3" x 1.5".

To make the multi-colored snowflake, apply red and blue ink onto the stamp. The two colors will blend to create this variation in color.

Use various baubles and crystals to further embellish the snowflake. Adhere it to the card with a foam adhesive square for some depth. Additional details like the twine, rub-on sentiment, and metal letter complete the look.

I hope you enjoyed this little project. Make up a bunch and use up all those items you have on hand.
Thank you, everyone, for stopping by today.
-Kim F.

SUPPLIES:
gelly jrs collection Snowflake
Chalk Ink by Colorbox
Cardstock by Worldwin
Patterned Paper by Die Cuts With A View
Rub-on Sentiment by Melissa Frances
Twine by Martha Stewart
Other: metal circle, chipboard circle, crystal, metal letter "U"

Saturday, August 25, 2012

Winter's Pine

If you'd like to take part in our blog hop, just head to this post to get started and find all the rules. Thank you for playing along!

Here is another super cute gel-a-tins gelly jr festive stamp. It might be small at 2 x2 but it packs a bit punch! . This stamp is called 'Winters Pine' and I used it to add some dimension to this simple card.

Image

Products used

gel-a-tins gelly jr 'Winters Pine' stamp
K&Company 'Swell Noel' 12x12 Paper Stack
Xyron 9" Creative Station
Foam pads
Glue Pen
Glue pad
White Embossing Powder
White Glitter
A5 Card

How It's Made

Cut out the base pattern paper and run through the Xyron 9" Creative Station and place on the front of the card. Cut out the church from the left over paper and adhere to the front using foam pads.

Image

Stamps the gel-a-tins 'Winters Pine' stamps and the little star onto matching blue paper and heat emboss with the white embossing powder. Cut out and stick to the card using foam pads.

Image

Cut out the sentiment from the paper pad and add to the top right corner using foam pads.

Image

Finish the card by drawing along the roof tops and hill edges with the glue pen and sprinkle with glitter.

Image

And that's it.

To buy this amazing stamp set please go to http://gelatinstamps.com/ . For more ideas and inspiration you can visit the gel-a-tins blog at http://gelatinstamps.blogspot.ie/ and on Facebook at https://www.facebook.com/gelatinstamps .

Friday, August 24, 2012

Snowflakes and Polka Dots

 If you'd like to take part in our blog hop, just head to this post to get started and find all the rules. Thank you for playing along!

Hello, Gel-a-tins fans! Thank you for stopping by today! So how many of you are ready for some cooler weather! I am dreaming of snow! I would love to wake up tomorrow morning to a blanket of the white stuff. But since we know that isn't going to happen, how about a card?

I love the snowflake gelly jr stamp! There are endless possibilities with this stamp!

I decided to fussy-cut the snowflake for this wintery card:

Image

I embossed the polka dots on the front of the card. To highlight the dots to look like snow, I rubbed a white ink pad across the front. I attached a simple sentiment to the card. The final touch was adding the snowflakes (with silver brads in the center) to the card.

Image

Once again, thanks for stopping by Gel-a-tins today! Please join us on our Facebook page and/or follow our blog!

Have a great day!
Jessi

Thursday, August 23, 2012

Neon Flame Flower

If you'd like to take part in our blog hop, just head to this post to get started and find all the rules. Thank you for playing along!

Hey everyone! Welcome back for another Gel-à-Tins post! Are you all enjoying this week's blog hop? It's so much fun hopping by all the talented Design Team blogs! So inspiring!! If you haven't had a chance to participate then make sure you do - there are prizes up for grabs!!

I'm back today with another card that's embracing a current trend - neon!

I know, neon?! Why on Earth would anyone want to use neon? Well, neon isn't all that bad - honest! I think there's a few rules you can follow to make your project look glam not garish!

For this feat I turned to the Gelly Jr's Hot Flames stamp:

Image

I'm pretty happy with how this turned out. It's certainly different(!)

Image

I started with a white cardstock panel and stamped 4 flames in pink to form a kind of diamond. I then added 4 yellow flames in between the pinks, and finally filled in the remaining gaps with 8 orange flames to create a full 'flower'. I've called it a flower but it also works as a tattoo-like design or something more tribal - love that! A little tip to make sure your design is in the centre - draw faint pencil lines to act as a guide and then erase when all your ink is dry - works like a charm!

Image

In order to balance out all those pops of neon it's important to use a white base and leave plenty of white space. It's also good to add some black to take some of the heat out of the design, hence stamping the sentiment in black.

Image

As a final finishing touch I added a big rhinestone to the centre and then adhered the panel to a white card base with just a little touch of dimension.


Supplies Used:

Gel-à-Tins:
Hot Flames stamp set

Other:
Congrats All Ways stamp set (Papertrey Ink)
Epic stamp set (Studio Calico)
Neon Pink, Neon Yellow, Neon Orange inks (Hero Arts), Versafine Onyx Black (Tsukineko)
Stamper's Select White cardstock (Papertrey Ink)
Foam adesive squares
Rhinestone (KaiserCraft)

I'd love to know what you think of this card. I know neon can be a bit scary and offputting but hopefully I've pulled off showing that it needn't be so!

Thanks for stopping by!!

Wednesday, August 22, 2012

Its Time for Fall Kitties!

If you'd like to take part in our blog hop, just head to this post to get started and find all the rules. Thank you for playing along!

Hello it's me Anita! Sadly summer is close to ending, well a few weeks left! Fall is just around the corner and as much as I love summer I do enjoy the colors and the season of fall. Especially if it's not a rainy dreary fall, I like the nice warm ones with the sun shining and the leaves turning! The colors of fall is simply gorgeous and today I have a fall card to share! The fall kitty Gelly Jr stamp is perfect for a fall card!

Image

I colored the kitty with Derwent pencils and blended it with Gamesol, and I paper pieced the kitty's hat! :> This kitty is so cute and so fun to stamp with! That's it from me today, hope your day is fantastic!

Products used:

Fall Kitty Gelly Jr by Gelatins
Indie Chic paper by My Mind's Eye
Black ink by Stampin Up
Twine by the Twinery
sentiment by Hero Arts
Derwent color pencils

Tuesday, August 21, 2012

Merry Christmas and Snowflakes

If you'd like to take part in our blog hop, just head to this post to get started and find all the rules.  Thank you for playing along!

Hi dear crafters!
Now it`s time to prepare for the new years holidays :)
And I have made my first Christmas card in this year))))

Image

Image

First step was to stamp snowflake on the background.Then I had aged the edge and toned them with ink.
Then I stamped snowflake again on another piece of paper and cropped each snowflake.
Made a composition on the card. Decorated card with ribbon,pin and rhinestones. Stamped the sign and glued it
That's all)

PRODUCTS USED
Gel-a-tins- gelly snowflake
MME paper
silk ribbon
Prima Marketing ink


Have a great crafting!
Tanya P.
http://www.diaryofcards.blogspot.com

Monday, August 20, 2012

It is time to Blog Hop!

Hey there and welcome to the gel-a-tins blog hop!

We have so many chances for you to win a prize during this blog hop!  You can win for commenting on the designer blogs (links are in the sidebar to the right), you can win by following this blog (just see the Google Connect box in the right sidebar) and you can also win by becoming a fan on Facebook and asking your friends to become a fan as well.  We're trying to hit 2500 fans!

Here is the order for the blog hop:
gel-a-tins
Jessica B.
Tanya
Anita
Taheerah
Jessi P.
Sharon
Kim F.
Nina
Again, the links are all right there in the right sidebar of this blog.  Just stop at each one, check out the work that the girls on the team have been doing (it is amazing!) and leave a comment on each of their blogs.  They will share the link to the next blog in line in their posts.

I know how busy things are this time of year, so we're having a week-long blog hop to give you plenty of time to visit all the blogs, comment and sign up to follow.  No matter how busy you are, you'll find a lot of inspiration here and at each designer's blog!

Did I mention the prizes?  Here they are!
The prize that will go to one of our blog followers on Google Friend Connent....


That's our adorable Love Knots stamp, the Pet Shop stamp set and some of out Plumeria scented embossing powder!

We will also draw one name from each of the designer blog comments and they will win one of these sets:


Those are some of our new gelly Jr. stamps and our colored acrylic blocks!  You'll love how versatile the stamps are and the blocks are so nice to work with.  I use mine every time I scrap!
Blog hop runs from Monday, August 20th through Tuesday, August 28th and midnight PST.

Friday, August 17, 2012

Let's Party!

Image

Hello, everyone! I am here today to share a card featuring the Hot Flames stamp from the gelly jr's collection.

When I saw this stamp, I had many ideas come to mind for cards and invitations. I decided to go with this cute skate that would make a great card or invitation for a girl's skating birthday party. The flame image gives it that perfect touch. Every pair of skates needs a flame!

To make the skate, I used a photograph for inspiration. I made a paper piecing pattern, and then cut out the parts of the skate using different colors of cardstock. The laces are twine wrapped around tiny, black brads.

To make the flame, I dabbed pink ink on the one end of the stamp, then blue ink on the other end of the stamp. The inks blend in the middle to form purple. When stamped onto white cardstock, you can see the color variations. I cut it out and adhered it to the skate.

The circle card base is pink cardstock and purple patterned paper.

I added a sentiment by using rub-ons and a notebook patterned paper.

I hope you enjoyed this fun card. Now it's time to party!
-Kim F.

SUPPLIES:
Hot Flames stamp by Gel-a-tins gelly jr's collection

Other:
Cardstock by Prism
Patterned Paper by Die Cuts With A View
Pink Twine by Martha Stewart
Black Brads
Letter Rub-ons by American Crafts
Chalk Ink by Colorbox
Circle Cutter (used to make the card base) by Martha Stewart
Circle Punch (used to make the wheels)

Thursday, August 16, 2012

Holly and Candy Canes

The Christmas crafting countdown has begun!. No christmas is complete without candy canes!. So as well as hanging them on your Christmas tree why not hang them from your cards too! I used the gel-a-tins 'Santa's Candy Cane' to make this 'sweet' card for the holidays!.

Image

Products Used

gel-a-tins gelly jr 'Santa's Candy Cane' 2x2 Stamp
docrafts Papermania Classic Christmas 12 x 12 pad
docrafts Papermania Classic Christmas Sentiments
American Crafts Speciality Foil Paper
Xyron 9" Creative Station
Xyron 150 X
Red Flat Back Gems
White Shimmer Paper
Red Embossing Powder

How It's Made

Cut the red American Crafts foiled paper to 5 3/4" x 5 3/4". Cut the docrafts Papermania Classic Christmas 'Christmas Message' paper 5 1/2" x 5 1/2". Matt and Layer together on the base card.

Image

Cut the green patterned paper 5 1/2" x 5 1/2" and run throught the Xyron 9" Creative Station and put on top of the card but twisted so the corners are off centre. Cut out the holly print topper and place on top of the green paper. Stick the red flat backed gems onto the centre holly berries.

Image

Using the gel-a-tins 'Santa's Candy Cane' stamp three canes and heat emboss. Run them through the Xyron 150 X. Place two of the canes together onto apiece of green matching paper and cut out. Place on the bottom right corner along with the 'Merry Christmas' sentiment.

Image

Place the third Candy Cane on the top left corner of the holly topper.

Image

And that's it.

To buy this amazing stamp set please go to http://gelatinstamps.com/ . For more ideas and inspiration you can visit the gel-a-tins blog at http://gelatinstamps.blogspot.ie/ and on Facebook at https://www.facebook.com/gelatinstamps .

Wednesday, August 15, 2012

Just Say NO to 30!

Hello, everyone! Today I am showcasing the new 'No Sign' gelly jr's. When I received this stamp, I really wanted to fussy-cut the sign. But I was not very successful. (So, please share any projects that you create with this sign cut out!)

I created a card that can be taken a few ways. It can go to someone who is turning 30, but doesn't want to accept it. Or it can be given to someone who is over the age, but not admitting their true age.

Image

Since I was not able to cut out the design, I ended stamping over the number stickers.

Image

The 'happy birthday' sentiment is stamped around the 'No Sign'. I thought about leaving the white space alone, but decided to add a die-cut banner.


Thank you for stopping by! Have a great day!

Tuesday, August 14, 2012

Ombre Butterflies

Hey everyone! Welcome to another Gel-à-Tins post!

I'm back today with a lovely little card that's right on trend!

Ombre is really big right now in crafting. You've probably seen it in a few different places now in blogland. Ombre is characterised by a graduation in colours in the same colour palette. I decided to combine this latest trend with the adorable Gelly Jr's Flutterby stamp to create today's beauty:

Image

I love how how this turned out!! I can definitely see this working in lots of different colour palettes!

Image

I started with a white card base and stamped the cute butterfly in various shades in the yellow/orange family. I was quite happy for the butterflies to overlap as it just added to the medley!

Image

When I had completely covered the card front I adhered a layer of vellum to it to give a nice soft finish. I then stamped the sentiment using brown ink.

Image

As a final finishing touch I added some rhinestones and a fussy-cut butterfly floating off the front! I made sure to stamp him using a mix of my colours and onto vellum to continue the floaty theme.


Supplies Used:

Gel-à-Tins:
Flutterby stamp set

Other:
Think Big Favourites #5 stamp set (Papertrey Ink)
Lemon Tart, Harvest Gold, Summer Sunrise, Orange Zest, Canyon Clay and Dark Chocolate inks (Papertrey Ink)
Stamper's Select White cardstock, Vellum (Papertrey Ink)
Pinflair Glue Gel (Olba)
Rhinestones
Scor-Tape

I'd love to know what you think of this little card. I just love how it echoes Autumn and falling leaves.

Thanks for fluttering by!!

Monday, August 13, 2012

A Snowy Surprise!

Hello! I can't believe it but today I have a Christmas project to share with you! :> I am not a big Christmas in the summer person! It's cold here the majority of the year and I don't want anything to remind me of what is coming! Enjoying the heat, wearing sandals, happy to not dress up the kids in snowsuits, pushing there feet into boots... But the Christmas Gelly Jr stamps has me inspired!

Today I have a Neighbor gift wrap to share! Yes I am that early! :> I enjoy bringing my neighbors small gifts at Christmas. Last year I made chocolate covered pretzel sticks! But how to give the gift without breaking the bank? Why not use simple brown paper lunch bags? Using stamps spruces them up! It's not that the neighbor actually cares how you wrap it, they are surprised that you thought of them! And stamping the bag really makes it pretty!

Image

Image

I stamped the Gelly Jr snowflake all over the bag with white, silver and blue ink. Wrote with a marker Love Your Neighbors! Stamped and cut out a snowflake and added it to a wooden close pin! Super easy and you can make a lot all at once! :> Hope you've been inspired!

Snowflake Gelly Jr by Gel a Tins Stamps
Frost White, Silver by Colorbox, Splash by Hero arts
Brown Paper Bag
Wooden Close Pin

Saturday, August 11, 2012

Paint and Flutterby

Hi dear crafters!
Today I have a new card for you:)
I made project with few layers and beautiful butterflies.

Image

Image

First of all I prepared the paper.Than stamped two butterflies. First with dark ink, second with light. Than made a composition and decorated card with white acrylic paint and the cap from a tube of paint)))


PRODUCTS USED
Gel-a-tins- gelly Butterfly

Brads
Prima Marketing ink
Dovecraft ink Nude
Paper Echo Park
Paper Sassafras

Have a great crafting!
Tanya P.
http://www.diaryofcards.blogspot.com

Friday, August 10, 2012

Back to School cards!

Hey all!  It's Jessica here with some fun little back to school cards that I put together. 


I was thinking that it would be fun to have some little cards ready to go for when I needed to send a thank you note to the teacher or for when I wanted to put a nice note in a lunch box for one of the boys.


The elements and papers are all from a pad by Echo Park called "School Daze."  I saw it at the LSS and fell in love, so it came home with me :)


I used my Xyron to attach everything and layered some of the embellishments with some foam adhesive that I made with my Xyron.


There are some Karen Foster brads and Twinery Twine in there too.  I love the look twine adds to a card!


This is a close-up of my back to school apples :)  I stamped the solid apple from the Sweet to the Core set in red then I stamped over it with the Love Knots stamp and brown ink.  I really like the texture this added to the apples.

I hope you're enjoying your summer (and school too, if you're already back like we are).  Be sure to stop by out Facebook page for info about contests and prizes!

Supplies Used:
gel-a-tins:  Sweet to the Core, Chevron-Tastic, Love Knots
Xyron: 2" Runner, Mega Runner, 150
Echo Park: School Daze paper pad
Karen Foster: brads
Inks:  Distress Ink, Staz-On, Stampin' Up
Twine: The Twinery
Misc: ribbon, tape

Thursday, August 9, 2012

Spread Your Wings

Hello stampers! Nina here with another simple card for pure stamping fun.

Image

I added some glitter randomly using my fingers:

Image

Supplies:
Stamps: Flutter By (Gelly Jr)
Inks: Pixie Dust, Spring Pansy, Sea Breeze, Aloe Vera (VersaMagic)