Friday, March 30, 2012

Hello and Happy Friday!

I hope you all have enjoyed your week and have a fun weekend planned.  If you've been thinking about trying out for our next DT term, this weekend is when you have to do it!  Check out our post and submit!

Today I have a fun little card that I made using the Spin Cycle and Snips and Snails sets.  I kept the sentiment pretty vague so that I could use it as either a congratulations for a baby card or as a little boy's birthday card.


I had a little pad of My Mind's Eye papers from Hobby Lobby that I used for this, along with my Stampin Up inks.  It only took some scissors and twine by The Twinery to finish it off.  I love how soft and pretty it turned out (even for a boy card).  :D

Enjoy your weekend and don't forget to submit!

Thursday, March 29, 2012

Time's a Ticking!

Hello and happy Thursday to you all!  I hope you've had a chance to check out our DT call.  If you love our stamps we'd love to have you on our team!  The deadline is coming up fast, so don't forget to submit!

Today I have another card that I made using the Time's a Ticking set.  I love all the clocks in this set and for this card I decided to use those clocks to make a flower.  It's a little different, but I like the way it came out.


I stamped and then cut out five of one of the round clocks, then pleated them to add some dimension.  The center clock was stamped and cut out of a green paper and I attached it with some foam adhesive that I made with my Xyron.  I think I'll have to make more of these in different sizes to use on a layout (but this would be a pretty funny little belated birthday card, don't you think?)

Supplies used:
Patterned paper by K & Co., Basic Grey and My Mind's Eye
Adhesive by Xyron
Trims by May Arts
Ink by Staz-On.
Button is Bazzill
Twine by The Twinery
Chipboard accent by Crate Paper
Leaves by Provo Craft

Wednesday, March 28, 2012

Merci card by Donna


Happy Wednesday! Today I made a card using the Wild Things & Merci Stamp Sets. I used a watercolor technique for the flowers that Tim Holtz talked about in his current online class that I am taking. He mentioned you could stamp with Distress Stains to get a watercolor effect so I thought I would try it. I used several different pink and purple stains and a green one for the stems. To do this technique you have to be able live with the areas that are smudged and not clear. That's what watercolor is like. Here's a close-up of the flowers. You can see how the colors blend together.


I thought the image was pretty enough that the card didn't need a lot of extras. I liked the Merci with the watercolor effect too. Thanks for stopping by and if you would like to see more of my Gel-a-tins projects, please stop by my blog at http://thecraftycorgi.blogspot.com

Materials
1. Stamps - Wild Things, Merci - Gel-a-tins
2. Distress Stains - Peeled Paint, Dusty Concord, Milled Lavender, Victorian Velvet, Spun Sugar - Tim Holtz
3. Ink - Tuxedo Black - Memento
4. Watercolor paper - Stampin' Up
5. Card stock - kraft, green - American Crafts

Tuesday, March 27, 2012

Stamped with love!

Image

Happy Tuesday! I love finding ways to incorporate stamps and fabric in my projects. It is a simple way to add dimension and texture to your projects. Today I am sharing with you an easy to stamp fabric and add this little flower to your next project.

Image

First, die cut five circles of fabric (used canvas here). Stamp each circle using Gel-A-Tins Spin Cycle polka-dot circle. String all five together, using a needle and thread. Add to any project! Used this same stamp to add color/pattern to scallop die cut border as well. Added the stamped leaf image to the layers using Unbeleafable.

Gel-A-Tins Supplies:
Spin Cycle
Unbeleafable

Additional Supplies:
Prairie Bird Boutique - wrinkle ribbon
K&Company - girl image
Papertrey Ink - ink, dies
Simple Stories - "remember" sticker
Crate Paper - label sticker, die cuts
Pink Paislee - paper
Glue Arts - foam, perma tac adhesive
adhesive pearls
alpha stickers
vintage buttons
stick pins
canvas

Andrea

Monday, March 26, 2012

Happy Monday and a DT tryout reminder!

Hey everyone!  Before Linda shares another beautiful card with you I'd like to remind you that this is the last week for our DT call!  Head over to this post to check out all the details.  I know that we have some amazing fans and I'd love to see you all try out!  Be sure to share our call with your friends as well.  Thanks!

Happy Monday!
This is Linda on Monday blog post... Today I am excited to share a card that I created using Love Knots stamp set. I stamped it on the diecut cardstock and kraft paper as shown on the picture.


Before adding multiple embellishments, I adhere yellow Webster Page netting to create a vintage look on the card. To finish, I added some millinery objects as shown on the bottom of the card. Chipboard was distressed using white acrylic paint and the sentiment was fabric ticket, also from Webster Page.


Other materials:
- Prima chipboard stickers
- Prima paper butterfly
- My Mind's Eye button
- Momenta paper
- Prima lace

Friday, March 23, 2012

Flutterby bright!

Hello and happy Friday!  It's Jessica again today and I have a very bright card to share with you today.  It's a little busy, but it's very cheery too and I think that it would be a great surprise to get from a friend.


Well, this is it!  I used the Butterflies are Free set to make this.  I stamped them onto patterned paper with Versamark ink and then embossed with the gel-a-tins White On and Cherry embossing powders.  The detail that you get with the stamps is so amazing and I love the way the color came out on the embossing. 


This was really a pretty quick card to put together, and because of the Cherry embossing powder, it even smells good! :)

I hope you've had a great week!  Don't forget that we have our DT call going on right now.  I would love to see all of our wonderful fans apply!  Check out the call here.

Thursday, March 22, 2012

Sweet Little Girl

Hello everyone...
I am here with a cute card today.  I am using Mojo Monday's Sketch #233.
Here is the sketch.
Image

I turned the sketch and used it like this:

Image
I am using the set called:
SUGAR AND SPICE

Image

Here is my version of the sketch from above.

Image

I think this is such a sweet set.  There are so many possibilities since there are so many stamps!

Image

I have no idea who I will give this card to, but I could use it for many different occasions, don't you agree?

Image

I hope you have enjoyed my sketch tweak today! Do you use sketches? I am new to using them but I am hooked!
What sketch sites you do like?
I would love to hear what you have to say.
This has been Jeannie with The Polka Cabanahttp://polkacabana.wordpress.com with today's post.

Wednesday, March 21, 2012

Decorated picture frame by Donna


Happy Wednesday! Thanks for joining us at the Gel-a-tins blog today. My project today is a decorated photo frame. I got a wooden frame at my local craft store. You can find these at most craft stores for about $2.

The first thing I did was sand it to smooth out the edges. Then I painted it with an Adirondack Paint Dabber in Mushroom. I used the Gel-a-tins stamp set called Wild Things and stamped the images on the frame using Black Versamark ink. It was super easy and fun project. I was looking on my refrigerator to find a picture to put in it and this was the only one big enough there. It's a picture of me with Michael Phelps at my brother's house at Thanksgiving a couple of years ago. My brother is his coach.


Thanks for stopping by today and be sure to stop by my blog to see more Gel-a-tins products http://thecraftycorgi.blogspot.com

Materials
1. Stamp set - Wild Things - Gel-a-tins
2. Wooden Frame - Michaels
3. Ink - black - Versamark
4. Paint Dabber - Mushroom - Adirondack

Tuesday, March 20, 2012

This one's for the boys...

Image

Taking it down a notch this week. All you need today is your cardstock, ink and favorite Gel-A-Tins stamps. With this card I wanted to go back to the basics through the use of ink, Spin Cycle and Super Star. This card will take less than ten minutes, but with a big impact...and a smile at the end of it.

Image

Begin by die cutting several circles. Stamp each one, using the larger circle stamp to add a border around the die cut shapes on the card itself. Add dimension using foam as you go as well to give a little more pop to certain elements.

Image

Used Snips & Snails and a little twine to finish off the card.

Gel-A-Tins Supplies:
Snips & Snails
Super Star
Spin Cycle

Additional Supplies:
Vintage Street Market - twine
Papertrey Ink - cardstock, ink, sentiment
Sizzix - circle die cut
Remember Me Emily - vintage button
Glue Arts - foam, adhesive

Monday, March 19, 2012

A barkingly cute card!

Hi all...
Today I am very excited to share my cute card that I created with combination of Cosmo Pups and 3-D alpha stamp sets. First, I distressed the base cardstock using sand paper and stamp the word "woof" with dye ink. Then I started layering the patterned papers and japanese washi tapes.


I stamped the bone image on top of cardstock sticker before I adhere it to the gingham ribbon. Then, I added light blue vintage button and flower. To finish the project, I add lace on the bottom of the card and distress the entire card with acrylic paint.

Other materials:
- October Afternoon patterned paper
- American Craft cardstock
- Japanese washi tapes
- My Mind's Eye button
- American Crafts ribbon
- Lace
- Crate paper cardstock sticker

Sunday, March 18, 2012

We need more gel-a-tinas!

Today we're announcing our design team tryout for our next term! Here's the info for you:

What we are looking for:

1. Eight design team members (international is okay).

2. People willing and able to commit to a six-month term. (May through October)

3. Stamping and embossing skills

4. Paper crafters that can really showcase our products on a variety of types of projects.

5. People with the ability and desire to promote their gel-a-tin projects all over the internet and at their local store.

Requirements:

1. Three/four projects per month- a mix of projects including layouts altered items and cards, not just four small cards per month.

2. Share all blog posts and projects (as well as hops and other promotions) on your personal blog, Twitter, Facebook and any other forums or sites you belong to.

3. Submitted projects require instructions and description and supply lists for blog posts.

4. Ability to take high-quality project photos.

5. Commitment to an initial webinar for an intro to the company, the owner, and to get to know the details of term. Samples of projects and expectations will be shared.

6. Participate on our DT forum and turn in all projects on time.

7. Ability to really show off gel-a-tin stamps and make them the star of your projects!

8. Ability to commit to a full six month term.

Design Team Member benefits:

1. One stamp set (minimum) per month of term.

2. Other supplies (embossing powders, blocks, etc.)

3. Get our new products first!

4. 25% discount on our other stamp sets


Design Team Tryout Submission Requirements:

1.Three projects showcasing stamping.We would prefer that these not all be the same type of project, but a mix of layouts, altered items and cards.Show off your stamping skills and your style! (these should each be files no larger than 500k and photos are very important! Take pictures that look professional and really show off your projects!)

2.Your name, address and phone number.

3.Bio about yourself: paper crafting history, etc.

4.Why you would like to be on our DT.

5.Links to blog, galleries, forums you participate in, etc.

6.Experience and current positions (no experience is required to make the team).

7.List of any publications your work has been in.


E-mail this info to Jessica at the following address: calls@gelatinstamps.com by April 1st. Designers will be announced on April 7th.

Friday, March 16, 2012

Sweet to the core!

Happy Friday to you all! 

My card today may only have a little green in it (you know, if you're thinking about St. Patrick's Day tomorrow) but it would definitely bring a smile to a friend's face.

This Sweet to the Core stamp set is so cute and versatile and I really like using it on my cards and layouts.  I hope you like what I made to share today!


I started by stamping some solid red apples and solid green pears onto white cardstock.  Then I went back and stamped the black background on them all.  I added the sentiment in black ink as well and then cut everything out.  I layered all the elements on my card and then added that fun red bow.  all you have to do to get that look is tie your bow, leaving a long tail on the loose end and then keep tying bows over the top until you have the look you want.  The stitching detail was just done free-hand with a black pen.  Quick and easy and very fun, I think.

Keep an eye out for our next DT call!  This has been a really great group of girls to work with, but now it's your chance to be a part of our team from May through October of this year.  The call goes out this weekend for the next gel-a-tinas!

Supplies:
Patterned Paper: Echo Park and Scenic Route
Ink: Stampin Up and Staz-On
Ribbon: May Arts
Adhesive: Xyron
Pen: Sakura
Paper swirls: Bazzill
Pins: Maya Road

Thursday, March 15, 2012

Card gone wild!

I have a beauty for you today. Plus I have an idea for you try out while we are at it!

I am using MOJO MONDAY'S SKETCH
Image

But for my card I turned it and used the sketch this way.

Image

What I did first was to get all my supplies out to stamp on a piece of twill tape.

Image

I just used regular stamping ink in a dark color and randomly stamped the twill tape.

Image

Since I was using the sketch, I cut all my papers and figured out what would go where, before I decided where to stamp on the papers.

Image

Here I have all my papers stamped and I'm ready to assemble my card.

Image

Here is the finished card.

Image

The white part of the card is more of a cream color, I had a hard time getting the light right today!  Sorry!

Image

I just love this set.  There is so much you can do with this.  The images are all just gorgeous.

Image

If you like my color and paper palette, I have Authentique Paper to thanks for that. I am using their line called Free Bird Comfort & Familiar.

I will be entering this in Mojo Monday's Challenge # 232.

I hope you enjoyed my idea, this would also work on certain ribbons, so I would love to hear if you try this out! Let me know.

This has been Jeannie with The Polka Cabana with today's post.

Wednesday, March 14, 2012

Distress Inks and Wild Things by Donna


Happy Wednesday! Today I'm using a new Gel-a-tins stamp set called Wild Things. I decided to use my distress inks to create this little scene. To make this card I lightly taped one of my oval Spellbinders Nestabilities to my card. I sponged on the inks with a dauber. Then I stamped in Versamark ink to make sure the images would stand out from the background. It's a simple technique that gives a beautiful result.

Here is the card with the oval attached.


Here is the stamp set. It has lots of nice silhouette images.


Materials

1. Stamp Set - Wild Things - Gel-a-tins
2. Card stock - Whisper White - Stampin' Up
3. Distress Inks - Stormy Sky, Wild Honey, Tea Dye
4. Sponge Daubers
5. Ink - Versamark - Black
6. Die - Oval - Spellbinders Nestabilities

Stop by my blog http://thecraftycorgi.blogspot.com to see more cards I've made with Gel-a-tin Stamps.

Tuesday, March 13, 2012

Smiling in the Spring!

project2_andreacard2.jpg

If Spring hasn't come your way yet, why not scrap it? Sharing with you a card today created with a few new stamp sets that are perfect for this time of year, making your projects bright and cheery.
project2_andreacard1.jpg


Used Gel-a-tins Spin Cycle to create a pink circle along the middle of card just for a pop of color. Gel-a-tins Unbeleafable stamp was the perfect addition to a bit of kraft paper stamped in green to bring a natural touch. The pink circle layer is stamped again with Spin Cycle. Finally, spring wouldn't be complete without a butterfly or two. Added the butterfly using Sugar & Spice. A sweet little touch to complete the look.

Let spring bloom in your craft space today!

Andrea

Gel-A-Tins Supplies:
Sugar & Spice
Spin Cycle
Unbeleafable

Additional Supplies:
Glue Arts - UCut-It Foam, adhesive
Heidi Swapp - paper, stamp
Papertrey - flower die, ink, button
Websters Pages - pom-pom trim
Frost It Pink - ribbon
Bazzill Basics - cardstock
Melissa Frances - adhesive pearls
Spellbinders - label die
doily

Monday, March 12, 2012

Hi there!

I hope you had a nice weekend... Lately, I have been into baby girl projects, to include card and baby album. And today, I would like to share my new baby girl card that I created with Sugar and Spice and Sweet Cakes stamp set.

For my starting point, I stamped multiple cherry images on the patterned paper and add pink pearls for accent. I started layering all the paper and distressed most of the edges. The envelope was created using vellum paper for transparency look. The vintage card is actually my childhood rummy card that I still collect until now.


On the detail photo above, you can see the stamped teddy bear image from Sugar and Spice stamp set that I distressed using dye ink and adhere on the front side of the envelope. The word "traditions" is a cardstock sticker I found in my stash.

Here is the other materials I used to create the entire card:
- Momenta patterned paper
- My Mind's Eye tag
- Doodle bug frill
- maya Road tricket
- May Arts ribbon
- Papertreyink die
- Melissa Frances patterned paper
- The twinery twine

happy creating!

Friday, March 9, 2012

Baby shower thank you cards

Happy beginning of spring break to those of you that start after today (like me).  The kids will be out early today and it will mean a lot of free time for me to skip driving anyone around and get some crafting done!

When I was pregnant with the twins, I had a great shower with family and friends.  One of the people that came gave me a packet of thank you notes along with some stamps so that I would be all set up to send them out after the shower.  I thought it was such a great gift (and I try to be good about sending thank yous) so I decided to use my gel-a-tins to make a version of notes that you could give as a gift at a baby shower.


I did a boy theme, but I used stamps from both the Sugar and Spice and the Snips and Snails sets.  Then I threw in that great stamp from the Merci set too :)  These were so quick and easy to put together, and I think that they'd be adorable all tied up with a little ribbon and given as a gift.

I hope you like these!  Please head over to our Facebook page and like us there to be sure that you'll see all of our specials and projects!

Supplies Used:
Stamps: gel-a-tins, Snips and Snails, Sugar and Spice, Merci
Mask:  Studio Calico
Adhesive: Xyron
Mist: Tattered Angels
Ink: Stampin Up
Ribbon: May Arts
PP: October Afternoon
Washi tape: American Crafts

Thursday, March 8, 2012

Card kit for kids

I have such a fun project and a story to share today!

Be prepared...LOT OF PICTURES!!

I am using the set called ELEPHANT GARDEN (ahem, again? Yes, I LOVE THIS SET!)

Image

I am using this tin I had left over from something. I am also using some mini cards and envelopes.

Image

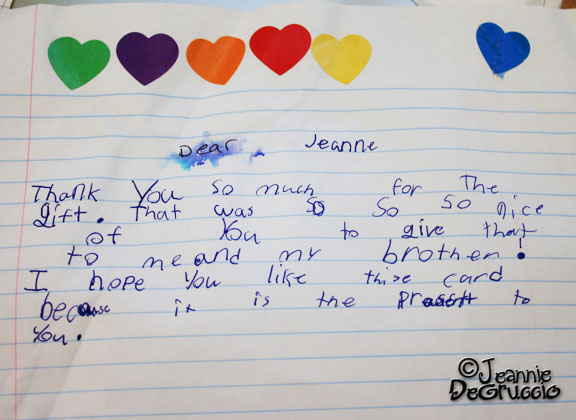
To begin, I had gotten this sweet not from a friends little one and I was so touched and impressed by the thoughtfulness of the note.

There is no way they could have known my slight obsession with Mr. ROY G BIV, so that made this thank you note even more special.
Image

It occurred to me that this sweet little one must do this often, sending notes or appreciation etc, and I thought I could make her a little card kit of her own.

Hence, today's project!

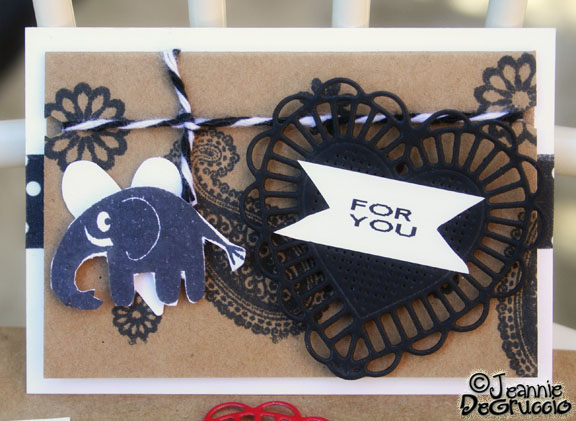
To start I needed to make a SAMPLE for her to follow so I used some of the ELEPHANT GARDEN STAMPS and created a random background on my card front.

Since I am making a rainbow themed card kit, I will make each card with the colors of the rainbow, you'll understand in a few more pictures.

Image

Here is the completed sample card.

Image

Inside each card I have placed this lined paper so she can write a little note.
Image

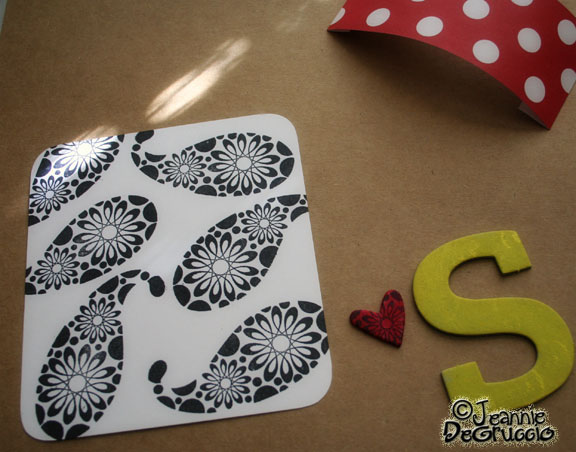
Here are all the cards for her to make with the pieces she will need.

Image

I tried to keep it all real simple and everything already has the adhesive attached.

I added a little place for her to sign the backs of her cards too.
Image

Each card has an envelope, they are all done in black so she does not need to fuss about matching those up with the right card.

Image

Now for the tin, I am using some chipboard and this wonderful paper ribbon. The ribbon is from PAPER JACKS and you can find them here. http://www.etsy.com/shop/Paperjacks
Image

I stamped the background and painted and inked the chipboard pieces.

Image

Then I took the paper ribbon and the chipboard letter and embossed them with black images.

Image

 Here is the completed tin, now to get everything stuffed in the tin.

Image

 Here is what it looks like when opened.

Image

 Here is the tin is all complete, all cards and sample are tucked safely inside.

Image

The tin was a little too fat to stay closed, so I just added the ribbon but as the cards are used and given away, the tin will be able to stay closed on its own.

Image

One last look, what do you think...will she like it??

Image

Well, that is it for me today! Again...head on over to Gel a Tins and that is where you can purchase this set for yourself.

Image

Be sure to head on over to Gel A Tins Blog and see what other things our Design Team ladies have made with all the fun Gel A Tins stamps.

Thanks for stopping by today.

This has been Jeannie with The Polka Cabana http://polkacabana.wordpress.com with today's post.