Tuesday, July 31, 2012

Snowflake Banner

Hello stampers, Nina here again!

Today I am sharing a easy banner with the snowflake Gelly Jr stamp.
Image

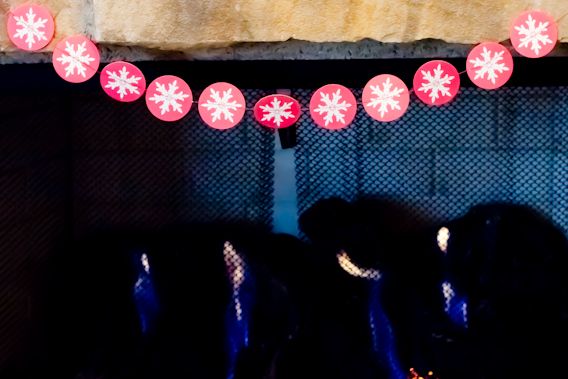
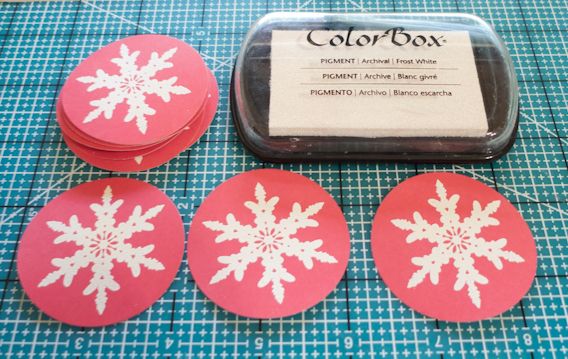
I punched several circles with a 2" circle punch and heat-embossed the snowflakes in white. I machine stitched them together.

Image

Alternatives:
- Use blue cardstock for a more wintry look.
- Just use white ink and let dry.
- Try heat emboss in red (or just red ink) on white cardstock
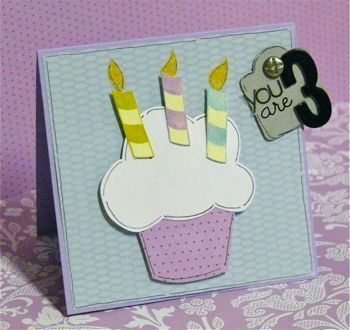
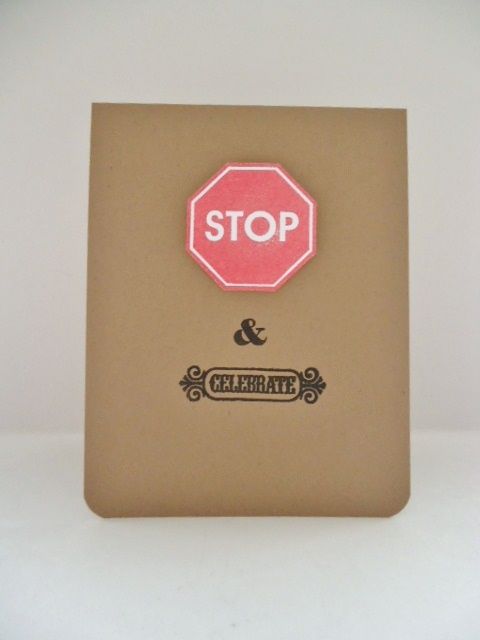
- Replace the snowflake with any image to suit your theme. (i.e, "doodle flower" for a girl's birthday party; "fall kitty" for Halloween)

It took me about 10 minutes to make the entire banner. I hope that you will give it a try! Happy Crafting!

Monday, July 30, 2012

You are 3!

Hi, everyone! I hope you had a good weekend.

I would like to share a card made with the candy cane stamp from the gelly jr's collection. As you can see, I used the candy cane design in a new way. I used just part of it to create the candles on this birthday cupcake.

Image

To create the candles, stamp the candy cane onto cardstock in 3 colors. Here I used purple, blue, and green. Cut out the straight part of the cane, trimming off the curved hook. Add them to a freehand-cut cupcake, a small tag with a sentiment, and you are done.

Thanks for stopping by. I hope you enjoy all the projects the Gel-a-tinas have in store for you this week!
-Kim

Supplies:
gelly jr's Candy Cane
Carstock by Prism
Patterned Paper by Die Cuts With A View
Letters and Number by American Crafts
Foam Adhesive Squares
Black Pen
Brad and Chipboard Tag Source Unknown

Saturday, July 28, 2012

Love to Laugh

We all have a friend who always makes us laugh when we are feeling down and is always there when we need a pick up. So why not use the new gel-a-tins gelly jr 'Love to Laugh' 2x2 stamp to make them a card as a thank you.

Image

Products Used

gel-a-tins gelly jr 'Love to laugh' 2x2 stamp
docrafts Daisy and Dandeloin Collection (Hawthorn & Bramble) Decoupage
docrafts Daisy and Dandeloin Collection Backing Papers
docrafts Papermania Capsule Collection Designer Die-Cuts
Xyron 9" Creative Station
Xyron 150 X
Xyron Mega Runner
Brown Satin Ribbon
Green Ric Rac Ribbon
Green Polka Dot Ribbon
DCWV Coloured Cardstock
Polka Dot Button
Mini Foam Pads
A5 Card

How It's Done

Line the base of the card with the polka dot paper. Assemble the decoupage image and place on the woodland patterned backing paper and round off the edges, layer onto a piece of DCWV brown cardstock. Run a lenght of green ribbon through the Xyron 150 x and place along the bottom. Use the Xyron Mega Runner to adhere the layer to the card.

Image

Cut the polka dot patterned designer die-cut in half and using the Xyron mega Runner place in the top left and bottom corner of the card.

Using the gel-a-tins gelly jr 'Love to Laugh' 2x2 stamp, stamp onto a 2 1/2" diameter circle of brown DCWV cardstock that had been layered on top of two contrasting green circles, stick together using the Xyron Mega Runner.

Image

Place the sentiment on the bottom right of the card.

On the top left corner stick the polka dot button using the Xyron Mega runner.

Image

Run the ribbon through the Xyron 150 X and adhere to the card along the top and down the left side.

Image

And that's it.

To buy this amazing stamp set please go to http://gelatinstamps.com/ . For more ideas and inspiration you can visit the gel-a-tins blog at http://gelatinstamps.blogspot.ie/ and on Facebook at https://www.facebook.com/gelatinstamps .

Friday, July 27, 2012

Two cards and a tip from Jessi!

Hello, everyone! It's is Jessi with you today! Today we will continue to showcase the Gel-a-tins newest releases- gelly jrs!

When I received the STOP sign gelly, I pondered for a few days to finalize the project I wanted to share with you guys. I could not decide on one card, so today, I will be sharing two with you.

The first card is a CAS card with the STOP sign popping of the card with a foam dot.

Image

The second card I wanted to make using a variety of symbols to make the message:

Image

I also wanted to share a quick tip with you guys. Do you have trouble getting the ink to transfer to your clear stamps smoothly? I found this wonderful tip on how to help have a solid image when it came to stamping. First, cover the stamp/image that you are going to use with Versamark Watermark Ink pad. Then add the color you will be stamping the image in. And voila!

Image

Thank you for stopping by today! Please stop by our shop to view all the new gelly jrs!

Jessi

Thursday, July 26, 2012

You are Pretty Amazing

Hey everyone! Thanks for stopping by!

I'm back today with a cute CAS card featuring the Doodle Flower Gelly Jr's stamp! Aren't you all loving these cute new little introductions from Gel-à-Tins?! They're so fun!!

I decided to keep it really simple and let the flower be the star of the show:

Image

I love how pretty this turned out to be! And it was so simple too!!

I started by stamping the flower onto some pattern paper and carefully cutting out. I then die cut some letters from the same paper. I used a black marker to outline the edges of the letters to help them pop.

Image

I then used dimensional glue gel to adhere all the pieces to a white card base, and stamped a small accompanying sentiment! So fun and yet so simple!!


Supplies Used:

Gel-à-Tins:
Doodle Flower stamp set

Other:
Simply You stamp set (Papertrey Ink)
Versafine Onyx Black ink, Memento Tuxedo Black marker (Tsukineko)
Miss Caroline Dolled Up Patterned Paper (My Mind's Eye)
Stamper's Select White cardstock (Papertrey Ink)
Upper Script Alphabet Dies (Papertrey Ink)
Pinflair Glue Gel (Olba)

I'd love to know what you think of this little card. See you again in August!!

Wednesday, July 25, 2012

Twice the fun with gel-a-tin stamps!

Hello! I hope that you are enjoying your July and your summer! :> It's Anita from http://craftygrldesigns.blogspot.com/ and today I am here with a card using a new Gelly Jr's stamp! :> Have you been enjoying all the creations starring the new Gelly Jr stamps? I sure have! Today I have a card featuring Doodle Flower! I love this flower it's so pretty!

Image

Can you tell what I did? I did one of my favorite techniques for clear stamps! I reversed the clear stamp on my block and stamped with the back of the stamp, it creates a solid color in the shape of the flower. Than I placed the stamp the correct way on my block and stamped it with brown ink again over top! Love clear stamps how you can do this! I love this look it colors the flower in and it's just so easy! And fun to do! :> I did it in fun summer colors and used a resin flower and fun sentiment to finish it off!

Thanks for stopping by today! I hope you have been inspired! Don't forget that on our facebook page everyday in July we are giving away Gelly Jr stamps!

Supplies used:

Doodle Flower Gelly Jr Gel a Tins Stamps
Inks: Tangelo by Memento
Bubble gum, butterball, ocean ink by Hero Arts
Chocolate Chip by Stampin Up
Cardstock: papertrey Ink
Prima Resign Flower
sentiment by Hero Arts

Tuesday, July 24, 2012

A pretty package

Hi dear crafters!
Today I have for you an easy packagе.
I made it like a package from shop and decorated with heart and flowers.

Image

I cropped heart from Pion Designs Paper and put on it flowers, brads, ribbon, cabochon, buttons, glossy, butterflies!

Image


PRODUCTS USED
Gel-a-tins- gelly jrs. Flutterfly
Pion designs paper
Brads Echo Park
Cabochon
Buttons
Flowers Maya Road
Glossy Accents Ranger


Have a great crafting!
Tanya P.
http://www.diaryofcards.blogspot.com

Saturday, July 21, 2012

I Pine for You

Hello crafters! Nina here again with another Gelly Jr stamp: the Winter Pine. I think it is designed for winter but a "I pine for you" card can be used at any time, right?

Image

I tried something new this time: stamp and then dry emboss. The results is a subtle texture to the card.

Image

Supplies used:

Winter's Pine (Gelly Jr by Gelatins)
Ink: (Cottage Ivy, Tuxedo Black) Tsukineko
Cardstock: (Solar White, Desert Sand) Neenah
Embossing Folder: (branches) Cuttlebug

Don't forget to join our Giveaway a Day on Facebook. Happy Crafting!

Friday, July 20, 2012

Peace, Birdie!

Image

Image

Today I would like to share a simple card using the "peace birdie" stamp from the gelly jr's collection. I actually altered the design a bit by cutting it apart and reassembling the pieces. You can sometimes get several looks from just one stamp.

To make this card, cut a 4x4 card base from light yellow cardstock. Freehand cut a waved line. Adhere light blue cardstock to the underside of the front. Trim the bottom in a similar waved line. Do this one more time with a darker blue cardstock.

To create the bird, I stamped it 3 times, cut out the body, then 2 wings. I reassembled the pieces with foam adhesive squares for some dimension. The sentiment is a rub on. I adhered one word at a time, making sure it followed the waved line. The remainder of the sentiment is on the inside. A few buttons were added for texture and interest.

I hope you enjoyed this card. Please share any projects you have created by altering your stamps.
Have a great weekend!
-Kim F.

Supplies:
gelly jr's Peace Birdie
Cardstock by Prism and Worldwin
Rub-on Sentiment by Melissa Frances
Colorbox Yellow Citrus Fluid Chalk Ink
Buttons
Foam Adhesive Squares
Zots Adhesive Dots (used for buttons)

Thursday, July 19, 2012

Pretty Pink Flutterby card

I love Butterflies, especially on crafting materials like paper and ribbon so I was beyond excited to get my hands on the latest gel-a-tins gelly jr 'Flutterby' 2 x 2 stamp. I used the stamp on printable acetate to create a dimensional effect.

Image

Products Used

gel-a-tins gelly jr 'Flutterby' Stamp
docrafts Papermania Lucy Cromwell Designstax
docrafts Papermania Lucy Cromwell Sentiments
Colorbox Pink Ink Pa
Xyron 9" Creative Station
Xyron 150 X
Xyron Mega Runner
Printable Acetate
White Shimmer Paper
White Satin Ribbon

How It's Made

Cut a piece of polka dot paper measuring 4 1/1" x 7 1/2" and run through the Xyron 9" Creative Station and place onto the front of the card, cut the second piece of patterned topper paper 3 3/4" x 6 3/4" and run through the Xyron 5" Creative Station and layer on top.

Using the gel-a-tins 'Flutterby' 2x2 gelly jr stamp and the colorbox pink ink pad stamp three Flutterby's onto the printable acetate and two onto the white shimmer paper. Cut out the Flutterby's. Turn the white Flutterby over so that the back is showing and run through the Xyron 150 X (inked side down) and place on the front of the card. Bend the wings of the acetate Flutterby's and using the Xyron Mega Runner down the underside of the body of the flutterby and place on top of the white Flutterby's.

Image

On the bottom of the card run the Xyron mega runner across the the patterned paper and adhere the white satin ribbon and then place the sentiment on top. Put the final 'Flutterby' on the corner of the sentiment.

Image

And that's it.

To buy this amazing stamp set please go to http://gelatinstamps.com/ . For more ideas and inspiration you can visit the gel-a-tins blog at http://gelatinstamps.blogspot.ie/ and on Facebook at https://www.facebook.com/gelatinstamps .

Wednesday, July 18, 2012

Doodle Flowers for Friends

Happy Wednesday, Gel-a-tin fans! I hope you have been enjoying the DT projects featuring the new gelly jrs! There have been so many inspiring projects so far!

I am excited to share with you this card I made using the 'Doodle Flower" gelly jr. stamp.

Image

The flower is perfect for cutting out and adding to any project! So get those scissors ready to fussy-cut! Along with cutting around the flower, I cut down the sides of each petal. This allowed each petal to be folded to add dimension to the card.

Image

The doodle flower is a perfect size to add a button for the center of the flower!

For more details, please stop by my bloghttp://kissinkrafts.blogspot.com/!

Once again, thank you for stopping by today! Hope you are inspired to create with the new gelly jrs!

Jessi

Tuesday, July 17, 2012

License Plate Crazy

Hey everyone! How are you all today?

I'm back today with a cute little masculine card created with a couple of Gel-à-Tins sets!

I wanted to create a masculine card that was kinda grungy but still made a stylish statement:

Image

Pretty cute huh?!

Image

I started with a mini cream card base and stamped it with the Chevron Grunge set. I love the combination of chevron with grunge - so inspired! I dropped some spray mist droplets onto the base too for just a little more grunge!

Image

I then stamped the license plates (one from the Vanity Plates set, one from a different stamp set), cut them out and adhered to the base with dimensional glue gel for a bit of pop! All it needed then was the little car from Traffic Signs to finish up this fun little card!!


Supplies Used:

Gel-à-Tins:
Chevron Grunge, Vanity plates, Traffic Signs stamp sets

Other:
Boys Rule stamp set (Unity/Simple Stories)
Kraft, Dark Chocolate, Smokey Shadow inks (Papertrey Ink), Brown Leather Satchel ink (Clear and Simple Stamps)
Vintage Cream cardstock (Papertrey Ink)
Pinflair Glue Gel (Olba)

I'd love to know what you think of this little card. Thanks so much for stopping by!!

Monday, July 16, 2012

Stop in the Name of Love!

Hello! Hope you're staying cool where you are! It's Anita Recksiedler from http://craftygrldesigns.blogspot.com/ and I am happy to be here today! I've been really enjoying the gelly jr stamps! Today I have a card to share using the STOP stamp! When I saw this stamp I just had to make this card:

Image

Tee hee hee first thing when I saw this stamp this popped in my head! STOP in the name of love I could not help it and just had to make it! I printed the sentiment from the computer out! Had to pair it with this heart paper! Stamped the Stop sign and cut it out and cut a thing strip of grey paper for the pole! And there you go a card that is share to make your recipient laugh! And if they don't that's okay I had a few good chuckles while I made it!

Supplies:

Gelly Jr Stop Stamp
Patterned Paper by Fancy Pants
Cardstock by Bazill
Cranberry Pigment Ink

Saturday, July 14, 2012

A Sweet Summer Bird

Hi to everyone!
Today I have again summer card, and my inspiration was birds!
I made with help of few pieces of paper, flower, silk ribbon, bradses and of course beautiful gel-a-tins stamp Bird.

Image
Image

At first I stamped bird, then decorated it with paper.Than I made a bow, few blots, and decored all composition with flower and brads :)


PRODUCTS USED
gel-a-tins stamp Bird
DCWV paper
Echo Park Paper
MME paper
Brads Echo Park
Prima Marketing ink
Flower

Have a great crafting!
Tanya P.
http://www.diaryofcards.blogspot.com

Friday, July 13, 2012

Candy Canes!

Hey gel-a-tins fans! I know it's only July and we're having record high temperatures, but it's also the time I start making my holiday cards. I have learned over the years that if I try to make them all at once right before they need to go out, it gets a bit overwhelming! I like to do a few cards each week so that I am ready when the time comes to send them out. One other thing I do when making my holiday cards is to make them simple!

I used the new gelly jr.'s santa's candy cane stamp and the cherry scented gelly powder. I love the scented embossing powder! It makes it feel like I'm embossing with candy.

Image
Supplies Used:
santa's candy cane gelly jr. stamp
cherry scented gelly powder
versamark ink

And here's a closer look at the embossing powder in action! I love this stuff. I can't wait to try out more scents.

Image

When do you guys start making your holiday cards? Do you have any tips to make holiday cards fun and easy?

Thursday, July 12, 2012

Burning Love

Morning stampers! Have you enjoyed the giveaway a day on Gelatins' Facebook Page? Love the new Gelly Jr's? :) Today I am sharing another card I made using the Hot Flame stamp. The sentiment is from Elvis Presley Burning Love Song :)

Image

The heart is from one of the older set called Hugs & Kisses. The flame can be a nice touch to almost any image!

Image

I designed the sentiment on my computer and print it out. I masked the heart off and stamped the flames.
Image

The flames sorta look like wings too! Cool and quick! I hope that you are inspired to use some flames in your projects. Happy Crafting!

Wednesday, July 11, 2012

Thinking of You

Thank you for thinking of us today and stopping by the blog. I hope you are enjoying all of the projects the gel-a-tinas are sharing. Please feel free to share any projects you create with any of the gel-a-tins stamps.

Here is a card I created using the flower stamp from the new gelly jrs collection. I can think of many uses for this design.

Image

To create this cute bouquet, stamp 3 flowers onto light yellow cardstock. Cut each one out. Use a stamp dauber to add a bit of ink around the edges. It gives each flower a little dimension. Embellish the centers with rhinestones, buttons, or anything else you may have in your stash.

Cut thin strips of green cardstock for stems. Use the dauber once more to add a bit of green ink. A very light touch is all that is needed. Add a chipboard plaque, a rub-on sentiment...finish off with two brads and more ink. Your card is ready to let that special someone know you are thinking of them!

Have a wonderful day, everyone!
Kim F.

Tuesday, July 10, 2012

Doodle Flower fun!

Gel-a-tins have released an funky new range of 2x2 clear stamps that are so adorable!. For this card I used the 'Doodle Flower' stamp and DCWV 'Street Lace' stack.

Image

Products Used

gel-a-tins gelly jr 'Doodle Flower' 2x2 clear stamp
DCWV 'Street Lace' 12 x 12 Papers and Embellishments
Light Blue Organza Ribbon
Flat Back Gems
Xyron 9" Creative Station
Xyron mega Runner
4 1/2" x 7 1/2" Card

How It's Done

Cut the DCWV paper 4 1/2" x 7 1/2", making sure that the blue pattern in slightly off centre and the grey flower motif is to the left hand side .

On the right hand side over the green patterned motif run the Xyron mega Runner down the centre from top to bottom and adhere a length of the blue organza ribbon.

Image

Stamp put three images using the 'Doodle Flower' stamp on co-ordinating green paper from the DCWV 'Street Lace' stack and curve up the petals and place down the blue motif in the centre of the card.

Image

Apply the flat back gems to the centre of the flowers.

Image

Put the DCWV 'Love' sentiment on the bottom right corner to finish.

Image

And that's it.

To buy this amazing stamp set please go to http://gelatinstamps.com/ . For more ideas and inspiration you can visti the gel-a-tins blog at http://gelatinstamps.blogspot.ie/ and on Facebook at https://www.facebook.com/gelatinstamps .

Monday, July 9, 2012

A Flock of Flutterflys

Happy Monday, everyone! Hope your weekend was wonderful! I am so excited to be sharing my first gelly jr. project with you today!

I am working with the adorable butterfly - "Flutterfly" that is part of the latest product line Gelly jrs! I have always loved the color combo of blue and white. And I thought this would be a perfect image to use with that combo!

Here it is:

Image

A close-up of the 3D butterflies on the card:

Image

I really like large images that are easy to 'fussy' cut! And this "Flutterfly" was perfect for just that! To add dimension to the card, I folded the wings up to add that special 3D effect. To add to the card, I used a variety of butterfly punches to add white butterflies to the card.

The finishing touches were to stamp the sentiment and attach with foam dots.

Supplies:
Gel-a-tins- gelly jrs. Flutterfly

Other:
Mohawk White Cardstock
Hampton Art Navy Ink
Fiskars Butterfly Punches
Studio G Friend Stamp
Foam Dots

Thank you for stopping by today! Please check back all month long for more project reveals using our new Gelly Jrs. line!

Jessi

Saturday, July 7, 2012

Love Knots tag by Taheerah

Hey everyone! I've missed you guys!

I'm back today with more Love Knots goodness! I just can't get enough of this baby, lol!

The last Love Knots tag I made was before I joined Gel-à-Tins and I think it was kinda vintage/rustic/masculine in style. Today's tag is more feminine in my opinion:

Image

I die-cut the tag from coaster board then stamped that gorgeous woodgrain pattern. I just love it so much!

Image

I added some little details such as the chevron stamped sideways down the tag, stamped numbers and sentiment and the 'Vintage' header. Lots of little details like that really add some character, and there's always more to see every time you look at it!

Image

My love of fussy cutting really shows with the tightrope walker that I stamped and cut out! But it was worth all that effort!!


Supplies Used:

Gel-à-Tins:
Love Knots stamp set

Other:
Postmarks, Button Boutique, Background Basics: Chevron Stripes stamp sets (Papertrey Ink)
Lost And Found Two Rosy Everything stamp set (My Mind's Eye)
Kraft, Dark Chocolate, Berry Sorbet and Pure Poppy inks (Papertrey Ink), Versafine Onyx Black ink (Tsukineko)
Dark Chocolate cardstock, coaster board (Papertrey Ink)
Tag Sale #3 die (Papertrey Ink)
Ribbon, Twine (May Arts)
Button (Papertrey Ink)
Rhinestones (stash)
Pinflair Glue Gel (Olba)

I'd love to know what you think of this tag. Thanks so much for stopping by!!