Monday, December 31, 2012

2013 Super Star!

Hi everyone! It's New Year's Eve and I've one more Gel-à-Tins project to share with you to see out 2012 and ring in the New Year!

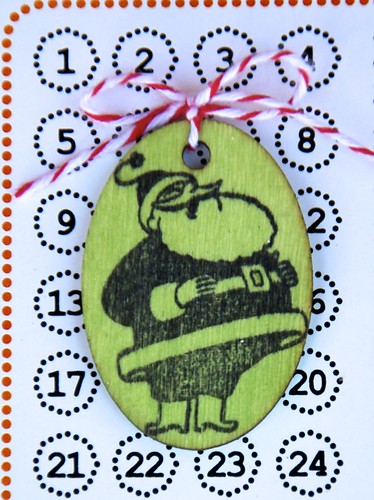
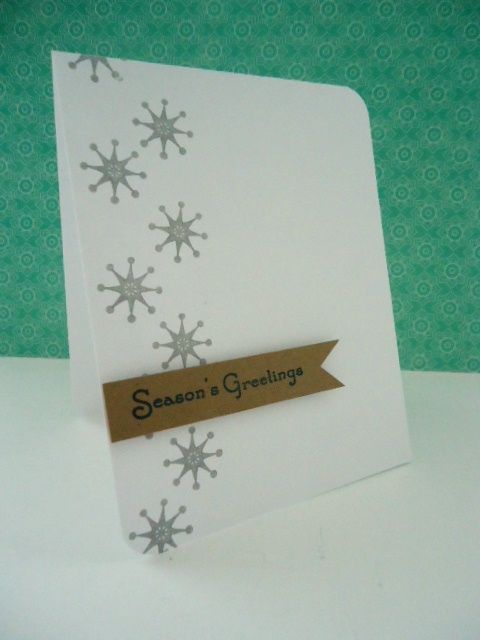
I got a little festive and let that drive my design. I wanted to celebrate and what better way to do that than a card created with the Super Star set!

I know you'll be gearing up for your celebrations about now so I won't delay in presenting today's card:

Image

Pretty neat huh?! If only you could see how much this sparkles in real life!

Image

I started by stamping the stars onto white cardstock using Versamark ink. I placed them all on one block to make stamping the whole thing a breeze! I only needed to add a few smaller stars separately near the edges!

Image

I then heat embossed the stars using some semi matt embossing powder. I wanted the stars to be there but not too in your face!

Image

After that I spritzed the whole card with some shimmer/shine spray to really make it sparkle!

Image

To finish off, I die cut some numbers and coated them with some sparkly glitter, before adhering to the base with dimensional glue gel. And that's all there was to it!


Supplies Used:

Gel-à-Tins:
Super Star

Other:
Versamark ink (Tsukineko)
Stamper's Select White cardstock (Papertrey Ink)
Spray Adhesive
Antique Silver Glitter (Martha Stewart)
Clear Semi Dull embossing powder (WOW!)
Calico Shine Spray (Studio Calico)


I want to take this opportunity to thank Gel-à-Tins for the crafting opportunities they have given me in 2012. I can't wait to be back in 2013 to share more projects with you all! Happy New Year everyone!!!

Saturday, December 29, 2012

Sweet Snowflakes


Christmas has passed. But winter is still here. So here is a frosty snowflake card you can send to people who didn't get a Christmas card from you (yet).

 
I used a very smooth cardstock for my base and added white embossing powder to my Mini Retro Flakes and Mini Fancy Flakes. Then I went in with a large dot stamp to fill in the spaces. I love the way it made such a soft background.

My next addition was the sentiment block wrapped in a little bit of twine. And to top everything off, out came a few buttons for some of the flakes.

Simple card...yet packs some punch.

Be sure to check back often as we share many more crafty ideas with you.
 

Friday, December 28, 2012

Make A Wish!

With the New Year a few days away we will all be thinking about our New Years Resolutions, I think I'll just make a wish that the new year is a good one!. For this project I again used the blue gel-a-tins gelly gem roll-ups to give my wishes a perfect start.

Image

Products Used

gel-a-tins gelly gem roll-ups (Blue)
gel-a-tins Stars Clear Stamps
Xyron 5" Creative Station
Xyron 2.5" Sticker maker
Bazzill Basics 'Dino-Mite' Stack
Papermania Blue Ink Stamp

I trimmed the papers to size, inked the edges and ran through the Xyron 5" Creative Station and applied to the card. I stamped the black page with the gel-a-tins star stamp

Image

I cut strips of the gel-a-tins gelly gems and ran through the Xyron 2.5" sticker maker and applied to the top edges of the card.

Image

On the front of the card i stamped the polkadot star and applied a 'Make a Wish' rub-on.

Image

To finish I stamped a large star on contrasting paper and cut out a star from the gel-a-tins gelly gem roll ups, ran through the Xyron 2.5" Sticker Maker and applied to the front of the card.

Image

To buy the amazing gel-a-tins gelly gem roll-ups visit our web page at http://gelatinstamps.com/index.php

Thursday, December 27, 2012

Groovy Santa Card

Making multi-purpose cards during the holiday season makes gift giving and sending thank yous a bit easier. I like to make cards that can be given away as a holiday cards or thank you cards for a holiday gift. For this card, I left off the sentiment and brought on the festive!

Image

The “Groovy Santa” collection has such a vintage, festive collection of Santas and sentiments. I started by stamping my Santa image onto a wooden tag with archival ink on each side of the tag. Once Santa was dried I then misted the tag. I love how the Santa has a fresh, vintage appearance!

Image

I realized that my stamped Santa wooden tag would make a cute ornament, so I adhered the tag to my card with some scotch tape. That way the tag can be taken off of the card and hung on a tree.

Gel-å-Tins (http://gelatinstamps.com) Supplies:
Groovy Santa Collection (Santa stamp)
Gingerbread House Collection (heart & candy stamps)

Other Supplies:
Bo Bunny Paper
Co’ordination Cardstock
Maya Road Wooden Tag
Ranger Archival Ink
Memento Ink
Tattered Angels Mist
Helmar Craft Glue

Thank you for visiting today!
~Katie
http://www.scissorsspatulassneakers.com

Wednesday, December 26, 2012

A Warm Thank You

I hope everyone had a wonderful holiday! What do you on the day after? Shop? Clean? Create? I don't know about you, but I try to get my Thank You cards done quickly!

It's Jessi here and today I am sharing a warm Thank You card using a couple stamps from a couple of different gel-a-tins sets.

Image

I choose to paper-piece the house from the Gingerbread House Stamp set. Once the house was complete, I used puffy paint to add the snow to the house. The final touch was to add the wreath and gold gem accents (from the gelly gem rolls).

Image

The sentiment (from the Honey Bear Stamp Set) was stamped onto the banner. The first part of the sentiment was done using a variety of letter stickers. The banner was attached to the card using foam dots.

Image

Thank you for stopping by today! Hope you have a grand day!

Supplies:
gel-a-tins - Gingerbread House Set, Honey Bear Set and gelly gem roll
Recollection Kraft Cardstock
Echo Park - This and That
Lily Bee Alpha Stickers
My Little Shoebox chipboard letter
Memento - Rich Cocoa Ink
Fiskars Snowflake Punch
Puffy Paint

Tuesday, December 25, 2012

Mini Notebook Stocking Stuffers

Are you an elf helper for Santa Claus? Get on the ball with these super sweet notebooks. They are a good size to slip into purses, the car, the locker at school, or a stocking!

Image

Image

By using Santa's Candy Cane scented Gelly Powder, these notebooks smell sweet to!
To make it extra special, monogram each one. Here I used gold duct tape for the binding and the monogram. Not only does it add holiday glitz, but it helps keep the new cover bound together.

Supplies:
Gel-a-tins: Gingerbread House
Santa's Candy Cane scented Gelly Powder
Colored Inks
Sakura Pen
Gold Duct Tape
Nesties
Ribbon and cord
Red Pearl Pen from Viva Decor

Monday, December 24, 2012

Adorable Ornaments!

Christmas is tomorrow so I wanted to share a couple of ornaments I made for my tree. The first one I just altered a little red bucket I found at Hobby Lobby. I added an Elle's Studio tag and then some embossed snowflakes from the mini retro flakes and sayings stamp set. The embossing powder is scented - Santa's candy cane. It smells as good as it sounds!
 
 
For my second ornament, I altered a CD and used the same stamp set and embossing powder. I also had some help from my Cricut; I cut the snowflakes from the Joys of the Season cartridge.


Thanks for stopping by today and I hope you enjoy your holiday!

Saturday, December 22, 2012

Lovely Love Knots

Hi dear crafters!!
Today I have for you sweet vintage card with a rose.
I took few pieces of paper, distressed them.On yellow paper stamped Love Knots. Than made a composition with chipboard, buttons. flower and silk ribbon. On of the corners decorated with metal corner.

Image

Image


PRODUCTS USED
gel-a-tins stamps Love Knots
SEI ink
Pion Designs paper
Studio75 flower
silk ribbon
buttons
chipboard


Hope you've enjoyed this card!
Have a great crafting!
Tanya P.
www.diaryofcards.blogspot.com

Friday, December 21, 2012

Candy Cane Joy

Hi everyone! It's getting close to Christmas now and I've one more Gel-à-Tins project to share with you before then!

Today I'm bringing you a quick and easy card featuring the Gelly Jr's Candy Cane stamp!

Did you know that with some creative masking this stamp can be so much more than a candy cane? Let me show you:

Image

Pretty neat huh?!

Image

I started by stamping the candy cane onto white cardstock. With some creative stamping and partial inking I was able to turn it into the letter 'y' and the letter 'o'!

Image

I wanted to keep this card very simple so all I did was trim the letters out, spray the letters with adhesive, coat with glitter and adhere to the base with dimensional glue gel and that was it!


Supplies Used:

Gel-à-Tins:
Gelly Jr's Candy Cane

Other:
Berry Sorbet ink (Papertrey Ink)
Stamper's Select White cardstock (Papertrey Ink)
Spray Adhesive
Crystal Fine Glitter (Martha Stewart)


I'd love to know what you think of this project. Thanks for stopping by, see you again soon - and Merry Christmas!!

Thursday, December 20, 2012

Gelly Gem Ornaments

Need a few cards for the really special people on your list? What could be better than shiny Christmas ornaments?

 I used thin ruled dies to cut out my ornaments and the bows. The green one is made from suede paper, but the red ones are made from Gelly Gem Roll Ups. I love that they can be cut with my dies. When you have plenty of dies, it is wonderful to find new media they can cut!

Who wouldn't enjoy this sparkly card? What can you make with Gelly Gem Roll Ups? We would love to see!

Check back often. We will always try to inspire you to get crafty.

Wednesday, December 19, 2012

Santa Gift Tags

Have you have been naughty or nice this year is year?. If you have been naughty there is still time to get yourself on the nice list by giving a Groovy Santa gift tag with your gifts. gel-a-tins have a super 'Groovy Santa' Clear Stamp set that is perfect for creating your own gift tags, cards, decorative envelopes and cracker buttons.

Image

Products Used

gel-a-tins 'Groovy Santa' clear stamp set
Xyron 5" Creative Station
Dovecraft 'Merry Magic' Stack
Dovecraft 'Merry Magic' Ribbon
We R Memory Keepers Buttons
We R Memory Keepers Eyelets
Flatback gems and pearls
Brown card tags
Clearsnap Red Ink Pad
Staz-On Black in Pad
Black Felt Tip Pen
White Ink Pen

These tags were so quick to make. I cut the backing papers to size and inked the edges and ran through the Xyron 5" Creative Station and applied to the pre-inked tags. The Santa's were stamped on plain card with the red ink and the 'To' and 'From' with the black ink. I used a black flt tip pen to accentuate Santa's features and a white pen on the fur parts.

Image

Image

Image

To buy the amazing gel-a-tins gelly gem roll-ups visit our web page at http://gelatinstamps.com/index.php

Tuesday, December 18, 2012

Decked Out Gingerbread House

I had so much fun creating this gingerbread house scene with the “Gingerbread House” and "Groovy Santa" collections!

Image

It was probably 6AM when I got inspired to stamp and fussy-cut and emboss this card. Luckily everyone sleeps away from my craft room because using my heat gun to emboss the Gelly Powder that early in the morning is no quiet task!

Image

I heat embossed “Santa’s Candy Cane” Gelly Powder on the top of my snow hills to give them dimension. I stamped and heat embossed the snowflakes. I also stamped the gingerbread house twice so I could fussy cut and layer the snowy roof and chimney. Both were heat embossed with the Gelly Powder.

For windows and doors I stamped the candy accents, fussy-cut the stamped images and then adhered them to the house. I embellished the stamped candy canes and gumdrops with Crystal Effects and glitter.

Image

You can see all the layers I created in this wintery gingerbread house card in the above picture.

Gel-å-Tins (http://gelatinstamps.com) Supplies:
Gingerbread House Collection (house & candy stamps)
Groovy Santa Collection (snowflakes & sentiment stamps)
Santa’s Candy Cane Scented Gelly Powder

Other Supplies:
PaperTrey Ink Cardstock
Momento Ink
Queen & Co Pearls
Helmar Craft Glue & Zapdots

Don't you want to make your own gingerbread house now?

~Katie
http://www.scissorsspatulassneakers.com

Monday, December 17, 2012

Clean and Simple for the Holidays

Hello, everyone! It's Jessi from Kissin' Krafts. Are you working on your Holiday cards? Trying to come up with a design and feel that your time is running out? Clean and Simple (CAS) cards are the way to go!

Here is a very simple card that can be made in the masses:

Image

Today I used the Groovy Santa set. The first step is to cut and fold an A2 card. Next, choose a image to stamp several times along the left side of the card. (I used one of the snowflakes from the Groovy Santa set. Now it is time for the sentiment. I stamped the sentiment onto kraft cardstock and cut it out on a banner. The sentiment is added to the card using foam dots to add dimension to the card.

Thank you for stopping by today! I hope you are enjoying all the holiday creations that the gel-a-tins Design Team have been showing to you!


Have a great day!!!!


Supplies:
gel-a-tins - Groovy Santa
Mohawk Cardstock
Recollection Kraft Cardstock
Studio G Silver Ink
AC Denim Ink
Foam Dots

Saturday, December 15, 2012

Vintage Tags

Are you tied up in string and have tape stuck to your hair? Take a moment from your gift wrapping and create some tags for those presents.
Think of your wrapping paper style and colors when designing your tags. I decided to go vintage with these Groovy Santa tags. I added a faux paper reinforcement by stamping the shutter from "Gingerbread house" and then punching out a hole and adding an eyelet. A little color and a touch of sparkle is perfect for this kraft tag set. I edged the tags in white pigment ink to soften the color a bit.

Image

Image


Supplies:
Gel-a-tins: Groovy Santa and Gingerbread House
Paper: Kraft
Colored Inks
Brown and white baker's twine
cream eyelets
stickles

Friday, December 14, 2012

Stamped Snowflake Ribbon!


This week I'm sharing a Christmas layout. I found this photo from when I was about three years old.

I used Gelatins mini retro flakes & sayings stamp set. I stamped on the scalloped ribbon using Poppy Parade ink by Stampin' Up. I arranged several stamps on my acrylic block and stamped on the ribbon. Then I removed those stamps & chose some different ones. After arranging those on my acrylic block, I stamped on the ribbon, alternating the pattern with the first set of stamping. I also attached a strip of silver gelly gems roll-ups for some extra bling to the layout. I'm dying to get my hands on the pretty red & pink gelly gems, as well as the studded!

Thanks for stopping by this week. Can't wait to see some of your Christmas projects!

Wednesday, December 12, 2012

Snowflake Scene

Hi everyone! I'm so glad to be back sharing a new Gel-à-Tins project with you!

Today I'm bringing you a quick and easy card featuring the Gelly Jr's Snowflake stamp! I've been waiting and waiting for Winter to come so I could use it!

I kept this very CAS and wanted to convey a falling snow scene:

Image

What do you think? Cute huh?!

Image

I started by stamping the snowflakes with white ink.

Image

I then stamped some others in Versamark ink and heat set with white embossing powder. I added some more snowflakes in the same way but didn't emboss them. I wanted a really soft, layered scene without having layers popping off the base. I finished by embossing the sentiment and that was it!


Supplies Used:

Gel-à-Tins:
Gelly Jr's Snowflake

Other:
On Ice stamp set (Papertrey Ink)
Fresh Snow ink (Papertrey Ink), Versamark (Tsukineko)
Spring Rain cardstock (Papertrey Ink)
White embossing powder


I'd love to know what you think of this project. Thanks for stopping by, see you again soon!!

Tuesday, December 11, 2012

Gingerbread Fun!

It's that time of year again! We all love making cards, so why not make them really special for those you love. This card looks complex, but really it is super simple to put together.


I embossed the Mini Fancy Flakes and the Mini Retro Flakes onto white cardstock and then added a bit of blue chalk to highlight them. Next I stamped and paper pieced the house from the Gingerbread House set. I had a few areas left to color in with my Copic markers. Using the same set, I embossed the green cardstock trees in white and then added some bling to complete my scene. And don't forget the border around the house made with red Gelly Gem Roll Ups! My final addition was the embossed banner. Let it Snow!!

Be sure to check back often for loads of fun and crafty ideas using our stamps and other great products.

See you soon.

Monday, December 10, 2012

Peace on Earth

Wow Christmas has come around really fast this year and this is the week for mailing your cards to your nearest and dearest. Why not bring a little sparkle to their festivities by using the amazing new gel-a-tins gelly gem roll-ups. I love the blue and the shimmer is so glam.

Image

Produts Used

gel-a-tins gelly gem roll-ups (Blue)
Xyron 5" Creative Station
Xyron Mega Runner
Mini Gems
Blue Ribbon
'Peace' Sentiment
mini gems
Trimcraft Up Up & Away Stack

For my Card I cut the gelly gem on my guillotine into a triangle to make my super sparkly Christmas tree. I used the Xyron 5" Creative Station to apply adhesive for a perfect finish. I added a few gems to the tree to give the effect of Christmas lights

Image

The star on the top of my tree was stamped and embossed using the gel-a-tins Starts Clear Stamps

Image

The bottom of the tree is finished with the blue ribbon held in place using the Xyron Mega Runner

Image

Finish the card by cuttin a strip of the gelly gems and run through the Xyron 5" creative Station and then remove the centre with a craft knife and use the remainder as a frame around the sentiment.

Image

To buy the amazing gel-a-tins gelly gem roll-ups visit our web page at http://gelatinstamps.com/index.php

Saturday, December 8, 2012

Merry, Merry Christmas Card

Creating fun & fanciful feminine cards is a holiday must for me each year! I was inspired to use the candy stamps from the "Gingerbread House" collection as accents for the dress form on this card.

Image

I heat embossed the stamped candy images and the chipboard snowflakes using “Santa’s Candy Cane” Scented Gelly Powder. The speckled powder definitely has the festive smell of candy canes!

Image

The dress and snowflakes are accented with Studded Gelly Gems Roll-Ups. I cut a small strip for the dress belt and cut individual silver studs for the other accents. They were so easy to cut and use!

Gel-å-Tins (http://gelatinstamps.com) Supplies:
Gingerbread House Collection
Groovy Santa Collection (sentiment)
Santa’s Candy Cane Scented Gelly Powder
Studded Gelly Gem Roll-ups

Other Supplies:
Bazzill Cardstock
Pink Paislee Paper
Basically Bare Dress Form
Tattered Angels Mist
Memento Ink
Jenny Bowlin Envelope
Helmar Glues

I hope you are now inspired to make something festive and feminine today!

~Katie
http://www.scissorsspatulassneakers.com