Hello everyone! I'm back this week with another card using the Happiness set. I used a different stamp from the set this time & some embossing. The embossing powder I used is rouge ZING! embossing powder by American Crafts.
Here's the stamp set:
Here's my card:
The ink I used for the sentiment is Stampin' Up poppy parade & the ribbon is from May Arts.
Here's a close up of the embossed stamped image:
Thanks for coming by today! Have a great week :)
Thursday, March 7, 2013
Wednesday, March 6, 2013
Heart with wings
Hi dear stampers!
Today I want to show you my new spring card.. about loove)))
For card I used few pieces of paper, die-cut heart from glittered paper and stamped wings, pearls, flower and vintage button covered with crackle paint and bow with key.
Firstly I prepared the buton for my card. Covered it with black paint, than with white cracle paint. Than I took 2 pieces of papers and made backgriund.
Wext step is creating the central composition with another papers, washi tape, die-cutted heart and stamped wings. Than we stick the button in the center of the heart.
Make stamps with little heart and borders in different parts of card and then decoratethis stamps with pearls and flower for finishing all composition of the card.
FOR CARD I USED:
gel-a-tins stamps set Hearts a Flutter
gel-a-tins stamps set Happiness
SEI paper
Paper Crate paper
Glittered paper Studio75
Pearls Paperdesign
Sizzix die
Distress crackle paint
I hope you liked my card)
Have a good day
Tanya
www,diaryofcards.blogspot.com
Have a good day
Tanya
www,diaryofcards.blogspot.com
Tuesday, March 5, 2013
Gelly Gem Altered Pegs
Hi everyone! How are you doing today? :-)
I've got another awesome Gelly Gem project today! Since I got these babies I seem to want to stick them on everything, lol! So today, I'm bringing you some mini altered pegs:
Cute huh? And so so glitzy and elegant thanks to all that bling!
I used some strong adhesive tape to adhere a strip of gems to one side of each peg, and some glue gel to secure a single gem on the reverse. To keep the tape from being sticky where there were no gems I sprinkled on some crystal glitter.
These little pegs also had a hole on one side so I added some silver cord and that was them all snazzed up and ready to go!
Here I've shown them holding tags, and dressing up a vintage milk bottle. But they could also be hung up and sporting family photos, special keepsakes... anything really! And thanks to the gorgeous Gelly Gems bling they also look super-sophisticated and perfect to grace any location!
Supplies used:
Gel-à-Tins:
Silver Gelly Gems
Other:
Crystal Fine Glitter (Martha Stewart)
Sterling Silver Cord (Clear And Simple Stamps)
Scor-Tape
Spray adhesive (Crafter's Companion)
Pinflair Glue Gel
I'll be back again soon to share another project, have a fabulous day and thanks for stopping by!!!
Taheerah xoxo
Monday, March 4, 2013
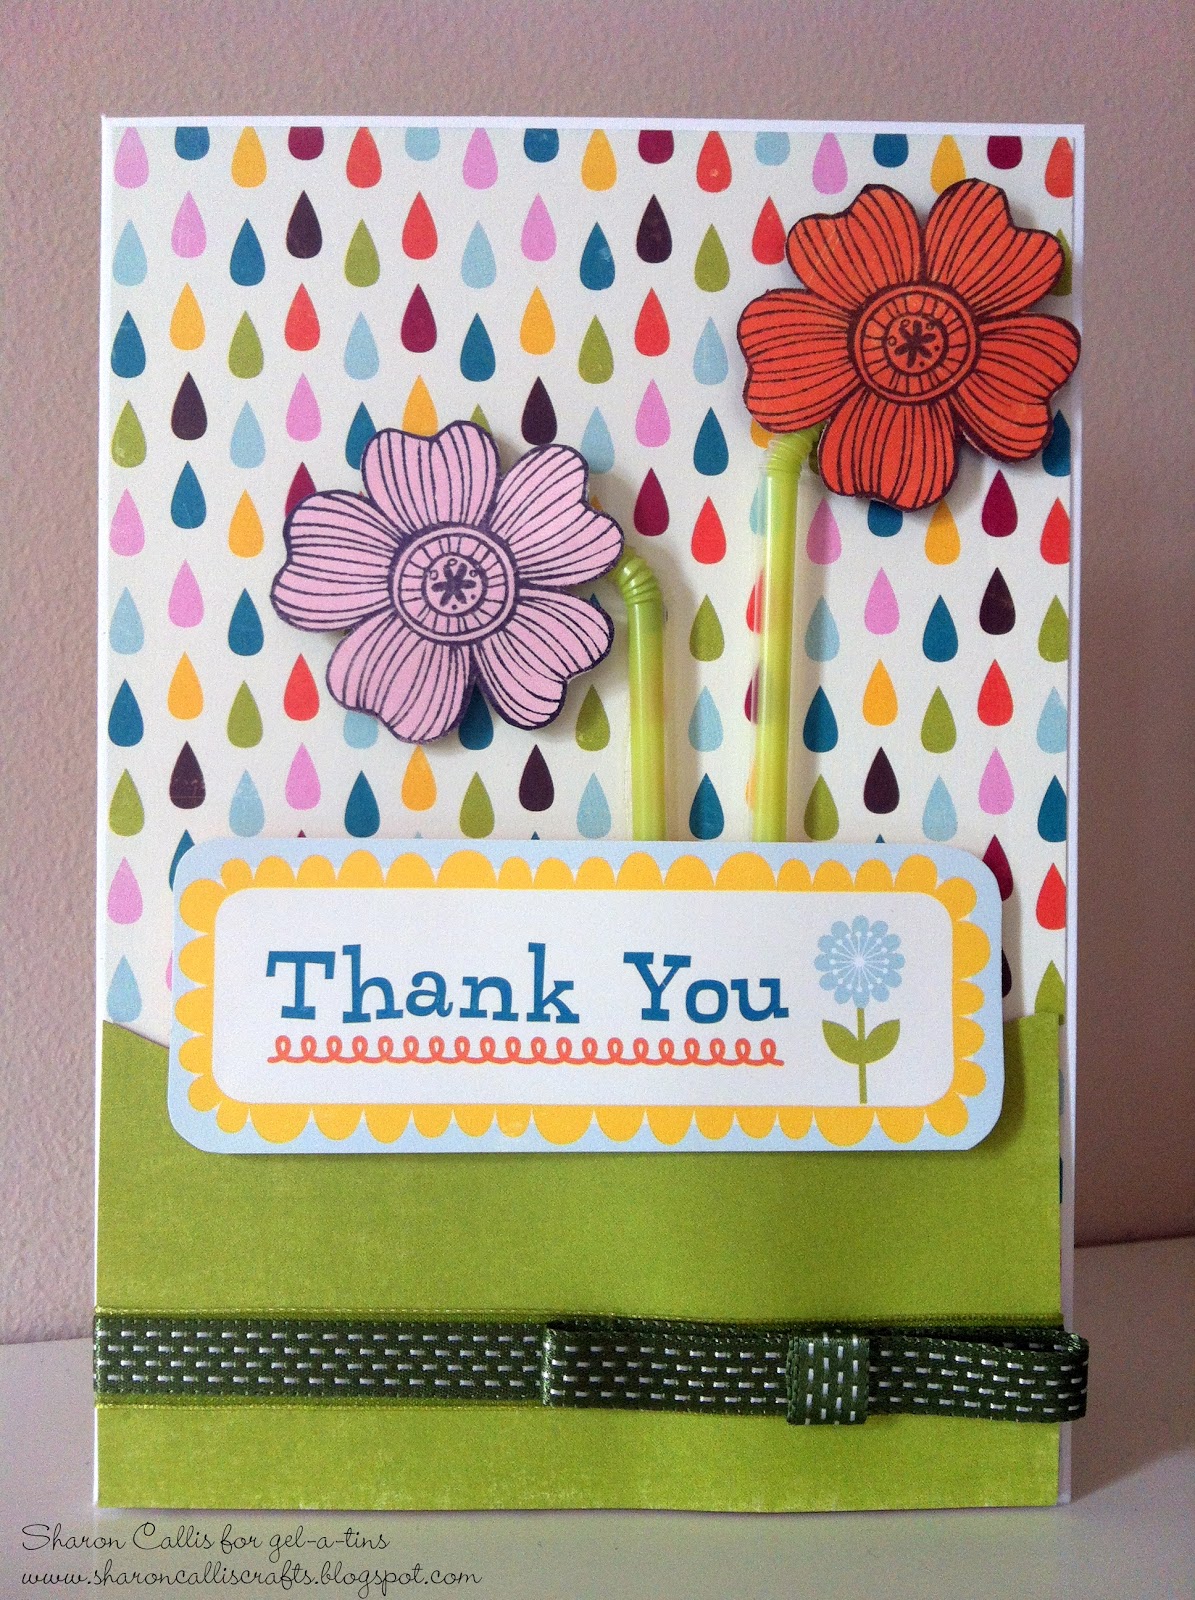
Thank You
My obsession with the gel-a-tins Doodle Flower Stamp continues!!. It is so versatile and can easily be used in so many different style of card. Today I made a bright and funky Thank You card.
Products Used
gel-a-tins 'Doodle Flower' Jelly Jr Stamp
StazOn Black Ink Pad
Xyron Mega Runner
Xyron 150 X
Echo park 'A walk in the Park' 12 x12 Collection
Plastic Drinking Straw
Scraps of Ribbon
Foam Pads
5"x7" Card Blank
I cut the base paper to size and adhered to the base card using the Xyron Mega Runner.
I stamped the 'Doodle Flower' using the StazOn Ink onto contrasting papers, I cut them out. I glued the two shortened straws to the base of the card and used foam pads to hold the flowers in place.
The 'Thank You' topper was cut from a larger sheet from the collection, this is held in place over the straws using the foam pads.
The ribbon was run through the Xyron 150 X and wrapped around the green card. The green card is then attached to the bottom of the card using foam pads, this gives it lift over the straws.
Saturday, March 2, 2013
Raining All Around
I do so love the quotes and rainy day images in the "Raindrops Are Falling" collection! The card I am sharing today highlights a multi-media tag utilizing both the "Raindrops Are Falling Collection" and the "Crackle Paint" background stamp.
Gel-å-Tins Stamps Supplies:
"Raindrops Are Falling" Collection
"Crackle Paint' Background Stamp
Gelly Gems "Studded" Roll-Ups
Other Supplies:
Bazzill Cardstock
Lily Bee Designs Paper
Quick Quotes PowderPuff Ink
Ranger Archival Ink
EK Success Border Punch
Robin's Nest Dew Drops
Dick Blick Gesso
Helmar Craft Glue, Zapdots, Decoupage & Gemstone Glue
Misc ribbons & brads
Tags are such a great way to add dimension and multi-media concepts to a card while still keeping it simple and pretty.
I hope you are inspired to pull out your stamps to create a fun tag today!
Raining All Around_card_gel-a-tins by ktbomb15, on Flickr
I started with a card sketch from My Sketch World (http://www.mysketchworld.com). The tag was created by cutting a piece of patterned paper with a tag die and decoupaging a couple pieces of a coordinating pattenered paper randomly on the tag.
Raining All Around_card_gel-a-tins_inset by ktbomb15, on Flickr
I spread a thin layer of gesso over a good portion of the tag and then impressed the "Crackled Paint" stamp into the gesso. Doesn't that have such a cool background effect?Raining All Around_card_gel-a-tins_inset2 by ktbomb15, on Flickr
Once the gesso dried, I randomly stamped the umbrellas, from "Raindrops Are Falling," over the tag with matching Quick Quotes Powder Puff Ink and added the sentiment, also from "Raindrops Are Falling," in black Archival Ink.Gel-å-Tins Stamps Supplies:
"Raindrops Are Falling" Collection
"Crackle Paint' Background Stamp
Gelly Gems "Studded" Roll-Ups
Other Supplies:
Bazzill Cardstock
Lily Bee Designs Paper
Quick Quotes PowderPuff Ink
Ranger Archival Ink
EK Success Border Punch
Robin's Nest Dew Drops
Dick Blick Gesso
Helmar Craft Glue, Zapdots, Decoupage & Gemstone Glue
Misc ribbons & brads
Tags are such a great way to add dimension and multi-media concepts to a card while still keeping it simple and pretty.
I hope you are inspired to pull out your stamps to create a fun tag today!
~Kate
Friday, March 1, 2013
Sweet gel-a-tins Thanks
Hello, gel-a-tins fans! It is Jessi here from Kissin' Krafts. Today I am excited to share my newest creation using gel-a-tins products.
I would like to show you this card using gel-a-tins Sweet Hearts, Honey Bear and gelly gem roll-ups:
To decorate the cupcake, I used black embossing powder to raise the edges of the outline. The frosting is made using puffy paint. Markers were used to color in the hearts and cupcake liner. Gelly gem roll-ups are made to look like sprinkles on cupcake.
This card is created using a variety of patterned papers. The sentiment (from Honey Bear) is stamped, repeatedly, onto one of the strips of paper.
Thank you for stopping by gel-a-tins! Check out gel-a-tins for the variety of stamps and gelly gems available!
Join us on Facebook to see more gel-a-tins inspiration and to get the latest news!
Supplies:
gel-a-tins - Sweet Hearts, Honey Bear and gelly gem roll-up - Silver
Lily Bee Designs and Dear Lizzy papers
Spectrum Noir Markers
AC Black Embossing Powder
Puffy Paint
Thursday, February 28, 2013
Another day...
That's right...another day closer to Spring!
And with that...spring showers.
Wouldn't you rather have showers or snow?
I would!
I paper pieced the umbrellas to create patterns.
A rainy day gets better when you have a brightly colored umbrella!
Stamps: Raindrops are Falling
I hope that spring is just around the corner from where you live!
Thanks for stopping by today,
Dawn Mercedes, of Sunnyside Up!
Wednesday, February 27, 2013
Happiness
Hello! My layout this week was made using the Happiness background and border
stamp set. I like the different backgrounds in this set. I used the swirl
background stamp and the single dotted line stamp on my page.
The swirl background stamp was stamped with Tim Holtz distressed ink in faded jeans. The single dot line stamp was stamped with white pigment ink from JoAnn's.
Thanks for stopping by & checking out my page. For more info about my layout, visit my blog: http://www.marklandandmain.blogspot.com
The swirl background stamp was stamped with Tim Holtz distressed ink in faded jeans. The single dot line stamp was stamped with white pigment ink from JoAnn's.
Thanks for stopping by & checking out my page. For more info about my layout, visit my blog: http://www.marklandandmain.blogspot.com
Monday, February 25, 2013
All-Silver Congrats
Hey everyone! How are you all today on this fine day?
I'm popping in to show you a card I created for Gel-à-Tins. None of our stamps on this today but I am using our *awesome* Gelly Gem roll-ups! These are a sheet of bling all woven together - such a great idea! You can cut off and use individual gems, or you can use a strip, like I've done today:

Colour me sparkled!! I think this all-silver card would be perfect for a Silver Anniversary!

I started with a silver card base and stamped the sentiment from using Versamark ink. I then heat embossed with silver embossing powder.

All that I needed to do then was to adhere my strip of gems! I did this with a little glue gel on the backs of some of the rows. No need to glue the whole thing down, just the edges will do!
Supplies Used:
Gel-à-Tins:
Silver Gelly Gem Roll-Ups
Other:
Think big Favourites #5 stamp set (Papertrey Ink)
Versamark ink (Tsukineko)
Sterling Silver cardstock (Clear and Simple Stamps)
Sterling Silver Super Fine embossing powder (WOW!)
Pinflair Glue Gel
Thanks so much for stopping by - I hope you have a wonderful day!!
I'm popping in to show you a card I created for Gel-à-Tins. None of our stamps on this today but I am using our *awesome* Gelly Gem roll-ups! These are a sheet of bling all woven together - such a great idea! You can cut off and use individual gems, or you can use a strip, like I've done today:

Colour me sparkled!! I think this all-silver card would be perfect for a Silver Anniversary!

I started with a silver card base and stamped the sentiment from using Versamark ink. I then heat embossed with silver embossing powder.

All that I needed to do then was to adhere my strip of gems! I did this with a little glue gel on the backs of some of the rows. No need to glue the whole thing down, just the edges will do!
Supplies Used:
Gel-à-Tins:
Silver Gelly Gem Roll-Ups
Other:
Think big Favourites #5 stamp set (Papertrey Ink)
Versamark ink (Tsukineko)
Sterling Silver cardstock (Clear and Simple Stamps)
Sterling Silver Super Fine embossing powder (WOW!)
Pinflair Glue Gel
Thanks so much for stopping by - I hope you have a wonderful day!!
Saturday, February 23, 2013
Game Day Treats!
Hello! Today I want to share a quick and easy project that you can make with the gel-a-tins Hoops stamp set.
I have twins that play basketball, and I like to make up a little treat for the end of the season. One year I did sugar cookies decorated like basketballs, and this is just the sort of packaging I needed and didn't have at the time :)
The great thing about this packaging is that you could really put any kind of cookie or brownie in there and the bag had that basketball theme. That would save a whole lot of time!
These bags have a bit of a waxy coating so they're perfect for food, and all I did was fold over the top (you would wait to do this after your cookies were inside), add a strip of paper (this one went through my Xyron 150 and it sticks to the paper perfectly), then twine, a punch and a couple of stamped images. How cute is that?
We also have a hockey set that is very cute for those of you whose kids are into hockey. Stamps can help you put together cute and easy gifts for your favorite team of kiddos!
Have a great weekend!
I have twins that play basketball, and I like to make up a little treat for the end of the season. One year I did sugar cookies decorated like basketballs, and this is just the sort of packaging I needed and didn't have at the time :)
The great thing about this packaging is that you could really put any kind of cookie or brownie in there and the bag had that basketball theme. That would save a whole lot of time!
These bags have a bit of a waxy coating so they're perfect for food, and all I did was fold over the top (you would wait to do this after your cookies were inside), add a strip of paper (this one went through my Xyron 150 and it sticks to the paper perfectly), then twine, a punch and a couple of stamped images. How cute is that?
We also have a hockey set that is very cute for those of you whose kids are into hockey. Stamps can help you put together cute and easy gifts for your favorite team of kiddos!
Have a great weekend!
Subscribe to:
Posts (Atom)