Showing posts with label Sugar and Spice. Show all posts

Thursday, April 26, 2012

My last gel-a-tins post!

This is a bittersweet post. My term is up this month with Gel A Tins stamps and I completely missed the Team Call for the next term

I have had a ton of fun creating with these adorable stamps.

I have to say my favorite thing about Gel A Tins is the fact they come in this wonderful Tin.

Storage is pretty easy when your stamps come in their own storage system.

Today I am using the set called Sugar & Spice.

Image

I am also using the Mojo Monday Sketch # 238.

Image

Here is my card for today:)

Image

I looked at the sketch and knew that I wanted to try using my Mini Polaroid die for this card.

Image

It a very simple color scheme and I think it is a fun variation of the Mojo Monday sketch.

Image

Just using white embossing powder, I was able to keep the black and white theme for the card.

But there is never a problem with a splash of pink, right?

Image

So there you have it: My last card for the wonderful and generous people over at Gel A Tins stamps.

I have had a lot of fun here and hope that you have enjoyed the things I have shared.

This has been Jeannie with The Polka Cabana with today's post.

Tuesday, April 3, 2012

Celebrate!

Image

All sunny and bright here today. Working with a little Sugar & Spice to make everything nice and colorful for my project today.
Just add a few layers of your favorite papers, Gel-A-Tins stamps and a few little dimensional embellishments to make this one pop.

Image

I find that I have several of these large flat buttons in my mix of supplies and after looking through my Spin Cycle stamp sets...it was a perfect match. Just apply ink to the stamp and press the stamp onto the middle of the button. Allow to dry before continue working. May be best to add the button to your project first to avoid smudging.

Gel-A-Tins Supplies:
Spin Cycle
Sugar & Spice

Additional Supplies:
Pink Paislee - paper
Precious Remembrance - sentiment stamp
Maya Road - chipboard window
Martha Stewart - tape
Spellbinders - heart scallop
ribbon
paint
stick pin

Thursday, March 22, 2012

Sweet Little Girl

Hello everyone...
I am here with a cute card today.  I am using Mojo Monday's Sketch #233.
Here is the sketch.
Image

I turned the sketch and used it like this:

Image
I am using the set called:
SUGAR AND SPICE

Image

Here is my version of the sketch from above.

Image

I think this is such a sweet set.  There are so many possibilities since there are so many stamps!

Image

I have no idea who I will give this card to, but I could use it for many different occasions, don't you agree?

Image

I hope you have enjoyed my sketch tweak today! Do you use sketches? I am new to using them but I am hooked!
What sketch sites you do like?
I would love to hear what you have to say.
This has been Jeannie with The Polka Cabanahttp://polkacabana.wordpress.com with today's post.

Tuesday, March 13, 2012

Smiling in the Spring!

project2_andreacard2.jpg

If Spring hasn't come your way yet, why not scrap it? Sharing with you a card today created with a few new stamp sets that are perfect for this time of year, making your projects bright and cheery.
project2_andreacard1.jpg


Used Gel-a-tins Spin Cycle to create a pink circle along the middle of card just for a pop of color. Gel-a-tins Unbeleafable stamp was the perfect addition to a bit of kraft paper stamped in green to bring a natural touch. The pink circle layer is stamped again with Spin Cycle. Finally, spring wouldn't be complete without a butterfly or two. Added the butterfly using Sugar & Spice. A sweet little touch to complete the look.

Let spring bloom in your craft space today!

Andrea

Gel-A-Tins Supplies:
Sugar & Spice
Spin Cycle
Unbeleafable

Additional Supplies:
Glue Arts - UCut-It Foam, adhesive
Heidi Swapp - paper, stamp
Papertrey - flower die, ink, button
Websters Pages - pom-pom trim
Frost It Pink - ribbon
Bazzill Basics - cardstock
Melissa Frances - adhesive pearls
Spellbinders - label die
doily

Monday, March 12, 2012

Hi there!

I hope you had a nice weekend... Lately, I have been into baby girl projects, to include card and baby album. And today, I would like to share my new baby girl card that I created with Sugar and Spice and Sweet Cakes stamp set.

For my starting point, I stamped multiple cherry images on the patterned paper and add pink pearls for accent. I started layering all the paper and distressed most of the edges. The envelope was created using vellum paper for transparency look. The vintage card is actually my childhood rummy card that I still collect until now.


On the detail photo above, you can see the stamped teddy bear image from Sugar and Spice stamp set that I distressed using dye ink and adhere on the front side of the envelope. The word "traditions" is a cardstock sticker I found in my stash.

Here is the other materials I used to create the entire card:
- Momenta patterned paper
- My Mind's Eye tag
- Doodle bug frill
- maya Road tricket
- May Arts ribbon
- Papertreyink die
- Melissa Frances patterned paper
- The twinery twine

happy creating!

Friday, March 9, 2012

Baby shower thank you cards

Happy beginning of spring break to those of you that start after today (like me).  The kids will be out early today and it will mean a lot of free time for me to skip driving anyone around and get some crafting done!

When I was pregnant with the twins, I had a great shower with family and friends.  One of the people that came gave me a packet of thank you notes along with some stamps so that I would be all set up to send them out after the shower.  I thought it was such a great gift (and I try to be good about sending thank yous) so I decided to use my gel-a-tins to make a version of notes that you could give as a gift at a baby shower.


I did a boy theme, but I used stamps from both the Sugar and Spice and the Snips and Snails sets.  Then I threw in that great stamp from the Merci set too :)  These were so quick and easy to put together, and I think that they'd be adorable all tied up with a little ribbon and given as a gift.

I hope you like these!  Please head over to our Facebook page and like us there to be sure that you'll see all of our specials and projects!

Supplies Used:
Stamps: gel-a-tins, Snips and Snails, Sugar and Spice, Merci
Mask:  Studio Calico
Adhesive: Xyron
Mist: Tattered Angels
Ink: Stampin Up
Ribbon: May Arts
PP: October Afternoon
Washi tape: American Crafts

Monday, March 5, 2012

Happy Monday!

I know that everybody is sooo ready for Spring season! Today I would like to share with you my new journal book. It is actually pretty simple to make and bring all the spring colors jumping out on the cover.


I used Sugar and Spice stamp set to create all of the stamped images on this book. On the bottom are the three identical stamped image that I stamped using different colors for variations. And on the top image (butterfly), I had applied pearl pen to emboss the body of the butterfly as you can see on the detail photo below;

Other materials that I used for this project:
- Moleskin book
- American Crafts chipboard sticker
- RANGER INK
- Maya Road chipboard
- My Mind's Eye lace
- Maya Road tricket
- American Crafts tape

Happy creating!

Tuesday, February 28, 2012

This is love...

Image

Sharing the love today with these adorable images from both Snips & Snails and Sugar & Spice. How sweet they are and just in time for those spring and summer weddings.
Image

Although the stamps are a rectangle shape, I liked the idea of creating something similar to game pieces. Added the top portion of a glassine bag to the front of the card, backed each stamped circle with foam tape and mounted the boy and girl images inside the bag. Used the circle stamps from Coffee Break and a heart punch to add a little detail to the outside of the bag.

Gel-A-Tin Supplies:
Coffee Break
Snips & Snails
Sugar & Spice

Additional Supplies:
October Afternoon - paper
My Mind's Eye - paper
Frost It Pink - ribbon
Remember Me Emily - button
Pink Paislee - postage stamps
Papertrey Ink - cardstock, sentiments
Epiphany Crafts - heart punch
Graphic 45 - paper
doily
glassine bag
stick pins
twine

Andrea

Thursday, February 9, 2012

Sweet Ballerina Card

I have come up with such a sweet card to show you today. What I did first was to make a tiny little slippers. They will look cute when the card is all assembled, trust me!

Image

For the background of the card, I had a rub-on that said TWIRL, so I adhered that first. Then, I stitched tulle over the background paper put some flower and gems in between the tulle and paper layers.

Image

I embossed the ballerina things in pink and assembled the card. The stamp is from the set called SUGAR and SPICE.
Image

Here is a close up of the card.

Image

I thought it turned out pretty cute! Lots and lots of PINK! What little girl would not be excited about that?
Image

I am having so much fun coming up with things with these stamps! I adore them and making things with them is never a chore. Thanks for letting me share this project with you today. This has been Jeannie from The Polka Cabana http://polkacabana.wordpress.com with today's post.

Tuesday, February 7, 2012

In Bloom

Image

Spring is coming and ready to see some color in the garden...well, crafting garden that is.
Image

I love creating felt flowers and finding creative ways to package them to give to friends. Used a combination of Gel-A-Tins Love Knots and Sugar & Spice to create a colorful mix of embellishments. Stamped a white envelope with Love Knots, added the felt flowers and stitched the envelope closed. Added a tag using a mini clothes pin and you have one colorful gift set.

Supplies:
Gel-A-Tins Love Knots
Gel-A-Tins Sugar & Spice
Remember Me Emily - buttons
Martha Stewart - tape
Pink Paislee - paper
Prairie Bird Boutique - ribbon
Quikutz - label die
Sizzix - label die
Papertrey Ink - paper
Epiphany Crafts - round 25 punch
mini clothes pin
envelopes
felt flowers

Tuesday, January 31, 2012

Bundle...

Image

Happy Tuesday! Here today to share with you a special card and gift box set that you can put together in under thirty minutes. Used Gel-A-Tins Sugar & Spice stamp set to create something for the little one.

Image

So here we go...
Card:
1. Begin with a folded cardstock and cut piece of paper for the front of the card. Stamp with Gel-A-Tins Coffee Break full circle to create a polka-dot effect. Cut smaller piece of paper, this can be any size just wide enough to fit the stamped images inside. Add fabric to the bottom, backside of the smaller piece of paper and sew onto larger (card front) piece of paper. Adhere to cardstock.
2. Add ribbon to center of card.
3. Stamp three images using Gel-A-Tins Sugar & Spice, cut out and mount onto card.
4. Add pom-pom trim, ric-rac, flower and glitter to card.
5. Die cut circle, stamp with Coffee Break Circle and sentiment stamps. Cut in half and adhere to card.

Image

The gift box was quite fun.
Gift Box:
1. Cut 2 pieces of cardstock. Stamp with Coffee Break and Love Knots.
2. Cut strip of cardstock, which will be used to create the box and score to create the bottom and sides of the box. Use your previously cut front and back side of the box as a guide to cutting and folding this piece.
3. Die cut two large circles, die cutting a smaller circle in the center. Die cut half of smaller circle at the top of the front and back. Adhere together.
4. Adhere the bag together and add embellishments.

Supplies:
Gel-A-Tins Love Knots
Gel-A-Tins Sugar & Spice
Gel-A-Tins Coffee Break
Pink Paislee - paper
Prairie Bird Boutique - ribbon
Prima - flower
Papertrey Ink - sentiment stamp, cardstock
Quickutz - circle die
Melissa Frances - pom-pom trim
ric-rac
fabric
mini clothes pin
thread
glitter

Wednesday, January 25, 2012

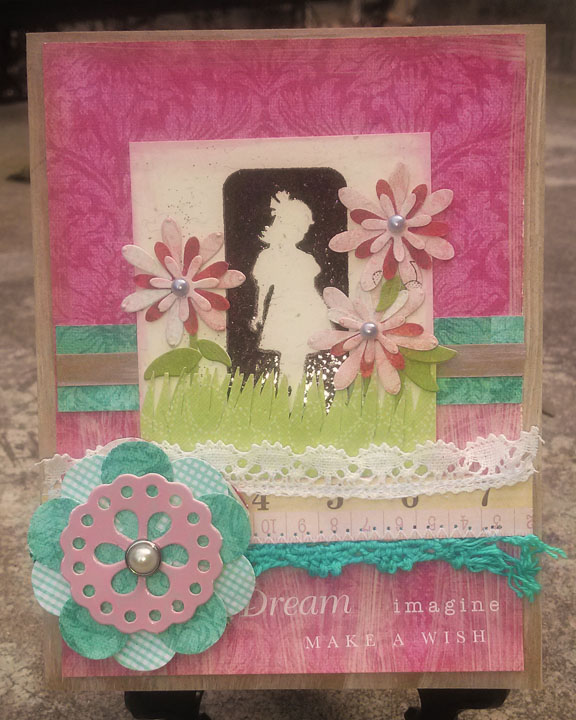
Sugar and Spice card by Jeannie

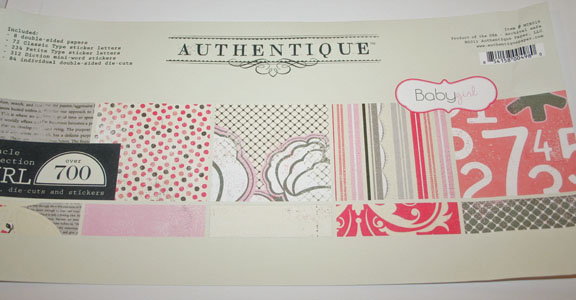
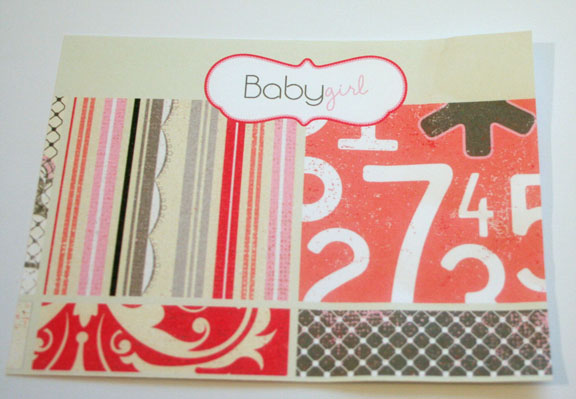
Today I want to show you a card I came up with just by looking at the wrapping on my Authentique paper Miracle Collection Kit.

Image

Just by looking at the above I thought it'd make a great background. Here it is cut to the size I needed.

Image

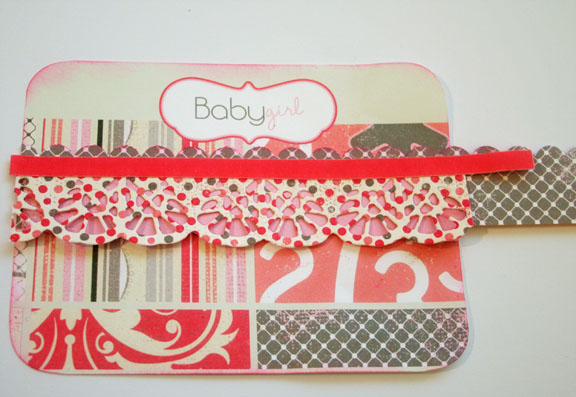
 You can see here, I am adding my layers of Cheery Lynn Designs border dies, fabric tape etc.
Image

 For the stamps I embossed them in a powder that is a bit "shabby chic." The image is distorted slightly, but it works for this card.

The set I am using is called:

Sugar & Spice
Image

Here is the card all assembled.
Image

I love the soft colors and they playful stamps.

Image

Such a cute card for a new bundle of joy!

Image

 I hope you will remember to look at covers of paper pads, kit inserts and packaging. There is always something that can be reused, just like I reused the kit insert on this card! Just remember to always, think out side of the box!

I hope you have enjoyed my post today! Be sure to visit the Gel A Tins blog because we have some AMAZING designers that are always coming up with new things to try!

Have a great day and see ya next week with more GEL A TINS fun!

This has been Jeannie from The Polka Cabana with today's post.

Tuesday, January 17, 2012

When you are in love...

Image

When I first saw these boy and girl stamps from Gel-A-Tins new release (Sugar & Spice and Snips & Snails) I knew they were meant for each other. So sweet, so easy to stamp and just perfect for Valentine's Day!

Image

Along with using these sets I also added a few others that you may recognize. Stamped along the bottom edge of the card is Coffee Break's circle stamp. The sentiment stamped scallop border is lightly stamped pink using Love Knots. And lastly, I used Love Knots to stamp a single heart, trimmed, mounted onto the girl image and glittered. Lots of subtle layers using a variety of stamps to give this card a completely romantic look.

Andrea

Supplies:
Gel-A-Tins Love Knots
Gel-A-Tins Sugar & Spice
Gel-A-Tins Snips & Snails
Gel-A-Tins Coffee Break

Additional Supplies:
Epiphany Crafts - circle punch
Melissa Frances - paper
Pink Paislee - paper
The Girl's Paperie - paper
Prairie Bird Boutique - ribbon
Remember Me Emily - button
Spellbinders - scallop rectangle die
adhesive pearls
glitter
lace
thread

Monday, January 9, 2012

Baby girl card by Linda

Hello all...
For this week project, I would like to share with you a cute baby girl card that I created using Sugar & Spice Stamp Set. I just love this stamp set, it allows me to create something so cute with a little bit of vintage look to it.

For cardbase, I used black and white strip patterned paper and add pink paper rectangle that has been layered with vintage 'the alphabet' figures and topped with stamped baby girl image on top of birthday cake with baby blue pearls to embellish. I machine stitch throughout, just for added accent throughout the main image. On the bottom of the card is plain naked chipboard that has been distressed with white ink and adhere on the card using foam tape. At the end, I wrap pink ribbon vertically and add wooden button and dress it nicely with stamped ABC block image on a small tag.

Other materials:
Crate paper patterned paper
Crate paper sticker
Queen & Co pearls
7 Gypsies diecut
May Arts ribbon
Tsukineko ink

I hope you enjoy this little project and create inspiration for your cute baby project in the future. Thank you... Happy stamping!

DSC_0419.jpg