Showing posts with label Angela. Show all posts

Monday, October 24, 2011

Fun and games!

Happy Monday to you all!  Today I have a very cute project made by our DT member Angela to share with you.  I know I talk a lot about all of the things you can use your stamps for besides card making, and this is a perfect example!

"One of the things I love about stamping is the ability to make something new out of paper and ink. I also homeschool my children and they are just the right age to really enjoy learning and playing games. I made a checkers game by using three buttons from the Buttoned Up set, two round buttons, stamped and heat embossed using Teal You What and Gellin Melon Gelly Powder, then stamped the square button to make a grid on my cardstock. The buttons punched out easily and quickly using a 1" circle punch. The coolest part? The entire game is magnetic - I punched and adhered thin magnetic sheets for the playing pieces, and used a stronger thicker magnet material for the game board (since it had to attract through the cardstock it was glued beneath). I love that my kids will be able to tuck this game board in a bag for travel and that it's flat to store easily!"


What a neat idea!  You could have a lot of fun with that (and what kid doesn't love getting a new game?).
Don't forget the monthly challenge!

Friday, October 21, 2011

You'll love this!

First up today I have the cutest project by Karin to share with you!  She used the Make a Wish set to make this gift wrap and tag and I don't know about you, but I think that the wrapping paper is one of the best parts of this gift :)

IMG_6215a.jpg

I also have a card from DT member Angela to share with you.  I really love the backgrounds you can create with our stamp sets.  Whether they're subtle or bright, they look amazing!


"I used three different sets to create this fun card. The polka dots are from Chocolate Bliss, the Thanks circle is of course from the Many Thanks set (there's also a text background from the same set, stamped with watermark ink on the kraft rectangle behind it) and the coral ribbon is from the Rock-a-Bye Baby set. The paper and sticker is from Crate Paper."

You still have time to enter the monthly challenge, so be sure to head over and check it out!

Wednesday, October 12, 2011

Too much good stuff!

I have such amazing projects to share with you today!  Angela and Cassie really went all out with these and I know you'll be glad you stopped by today and got to see them!

Angela made a set of cards with the Chocolate Bliss set that is wonderful!  I love that she did this color combo and I'm sure you'll love it too :)

"Had a lot of fun making a little gift set using the Chocolates set!"

Image

"I made a card, a little gift bag which I filled with mini chocolate bars, and a tag and matching envelope."

Image

"I stamped the chocolates in Desert Sand and Chocolate Chip ink and then glittered some using a Spica glitter pen. The paper is Farmhouse by Crate Paper."

Image

"This is a detail from the front of the bag."

Image

Image

"I cut the library card style envelope using my Silhouette digital cutter, and then made a tag to fit inside."

Image

"The sparkly bits are Pink Paislee glitter stickers, and that Spica glitter pen again!
The chocolate stamps stamp so smoothly and I confess I had a chocolate craving or two - that chocolate bag is not as full as it should be!"

Every one of those is awesome!  Thank you, Angela!

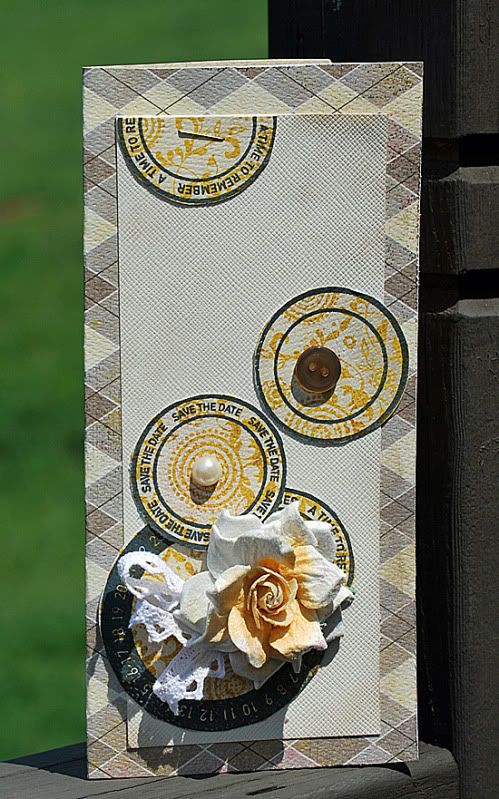
Cassie made a card with the Save the Date set that I can't wait to lift.  The colors are so perfect together and if you look closely you'll see that she made everything from the patterned paper to the embellishment with the stamp set.  What a great way to save money (and you end up with a card that looks a million times better than anything you can find in a store!)

"I made an anniversary card for my in-laws using the Save the Date set. The circles could be used on all sorts of projects, but I think they made a great background paper. There are just so many possibilities with this set!"

SavetheDateCT1nwm.JPG

Stamps: Save the Date
Ink: SU So Saffron, SU Baja Breeze, SU Real Red
Paper: SU Saffron, CDS Cottonball White, SU Baja Breeze
Accessories: red ribbon, dimensionals, Circle Nestabilities

Now, the Operation Write Home challenge may be over, but we still have this month's challenge going on.  Head over here to check it out and then get going on a project to enter!

Monday, October 3, 2011

Good Monday Morning!

I'm hoping that today's projects will wake you up and get you ready for a week full of creativity!  I plan on getting crafty this week for sure (I just hope that the kids can get along for their fall break and let me enjoy some time where I don't have to run around so much)!

I made our first project for today.  It's a thank you card, and I used the Many Thanks set and the Unbeleafable sets on this one. 


I used the square leaf stamp and some green ink to make the background.  I thought that setting it on the diagonal would be pretty, and I really like the way it turned out.  I gave it a mist with some Tattered Angels goodness and let it dry, then I layered ribbon and paper on top of the background.  They're stuck down with my Xyron machine, so they're not going anywhere.  For the leafy accents I stamped a few different stamps in the same green ink and then cut them out, leaving a green border around the leaves.  I traced the main image in black ink and then layered them with raffia and foam adhesive.  The sentiment is from the Many Thanks set and I love the font on it.  Very simple and just perfect for any card!

Angela has a project for you that I think you'll love.  This little card set and holder is super cute!

Image

"With this project, I had busy newlyweds in mind - you know how much work it is to send out thank you's after a wedding! The smaller the card, the less you have to write, right? These cards are also very quick to reproduce and make, assembly-line fashion and would make a great gift."

Image

"Each card is 3" square, and I've made two variations. One has the background paper stamped and corners rounded."

Image

"This card has three corners punched, using a Kreaxions punch from Just Imagine Crafts. The sentiment is stamped and punched using a 1" circle punch from EK Success."
Image

"I made a matchbook style case to hold three cards - any more and you'd need a box for them - the bottom flap tucks under the border punched strip to hold it closed."

Image

The cards inside their holder.
Additional Supplies used:
Card Stock: Close to My Heart
Ink: Close to My Heart Gypsy
Punches: EK Success, Stampin' Up!, Just Imagine/Kreaxions

Wednesday, September 28, 2011

Thanks a lot!

You know that I love a cute thank you card, so today's post is a favorite for me!  Check out the fabulous cards from Gladys and Angela that I have to share!

"I have so much fun stamping my own background using the Admission is Free set from gel-a-tins. They have the solid and the outline stamp of the ticket. I started off stamping the solid ticket in the middle and work my way out. Love the subtle look. For the sentiment, I used the many thanks stamp set."

thankuadmissionfree1.jpg

Supplies:
Paper: Aqua mist from pti, bitty dot from pti, webster page ladies collection, echo park from little girl
Ink: versafine onxy black, Snow fresh from pti
Stamps: Admission is free and many thanks from gelatins
Others: edger #1 collection, leafy vine border, turning a new leaf die, twine

I think that background paper made with the ticket stamps is amazing!  Speaking of making background paper with a stamp, Angela has something else to share...

"I love making my own patterned paper using stamps! For this card I inked the card base in Desert Sand and Black ink, using the Many Thanks set."


Image

"I die cut a tag using paper from My Mind's Eye and a Papertrey Ink die, and stamped the sentiment at the bottom, then added a flower from Sassafras. I punched a little scallop strip using My Mind's Eye paper and a punch from EK Success. The black dotted paper is from October Afternoon.
I think the stamped patterned paper really adds emphasis to the sentiment!"

Isn't that the cutest?  I need to go make one for myself!  Don't forget, we still have the Operation Write Home challenge going on and you have a little more time to send in your monthly challenge project!

Tune in tomorrow for our big DT announcement!

Monday, September 26, 2011

More Monday Crafting!

Hello and happy Monday to you all!  We're back with more projects for you and I know you'll be inspired just like I was when I saw these.
Karin is up first with another one of her amazing cards.  She used the Build Your Own Flourish set to make this one and I love the tone on tone look of it!

"There are many fabulous stamps in the "Build a Flourish" set and all of them work so well together - this set has actually become one of my favourites!!! . For this card I used the ornate corner stamp with purple ink on my already patterned paper to bring my card together. Then I used the same ink for decorating my little flower label. I finished with stamping a sentiment from the "Many Thanks" set which is perfect for all different styles of thank you cards!"


Stamps: Gel a tins - "Build a Flourish" and "Many Thanks" , Dies: Spellbinders, Patterned paper; Pion Design + dried flower

Angela has another card to share with us.  I love using stamps for something that's not their original shape.  Making these dimensional scallops with the Build Your Own Paisley- Floral set is a great idea.  This is such a pretty card!

"I've been seeing layered scallops all over the place lately and I wanted to try it using the paisley stamps from the Build Your Own Paisley Floral set. It worked so well! Starting with the bottom layer, I alternated colours and curled up the bottom edge, then trimmed off the excess."

Image

Image 

"The thank you sentiment is from the Many Thanks set. I love how this turned out! Almost perfect."

Keep on working on those cards for Operation Write Home challenge and the Monthly Challenge.  I'm loving all the things that you've been making!

Wednesday, September 21, 2011

Hello and Happy Wednesday!

We're back to get you through the middle of the week with more inspiration!  Today we have two more cards to share with you.  Let's get to it!

This first card is by Ellen and I love this grey and yellow color combo!

"I love the idea of having wedding cards available since we go to so many and I never seem to have a card. This Save the Date stamp is perfect!  Mix and match the circles to create your own design."

Zoom out

Supplies:
Save the Date Gel-a-tins stamp
Teresa Collins pearl
Creative Imaginations button
Bazzill Cardstock
Authentique Papers
Prima Flower
AC Pigment Ink

Angela has another card today that she made with the Build Your Own Paisley-Floral set.  I love all the different ways she's been showing this off!

Image

"I went with a monochromatic look for this card, heat embossing the paisley onto a die cut using White On! Gelly powder. I then sponged ink over the embossed image. The background paper is stamped using the same colour ink and the dotted outline paisley stamp from the set."

Be sure to check out our monthly challenge and give it a try!  See you again tomorrow with a challenge and a way to help a great cause!

Friday, September 16, 2011

More new projects and a reminder!

It's Friday!  I'm looking forward to a weekend with temps under 100.  When you live in AZ, it's the little things like that that can make you day :)

This is your final weekend to get in your Design Team application!  Go here for the details and don't forget!

Today we have projects from Angela and Cassie.  Check out these adorable cards!  First up is Cassie.

"This big pumpkin image is great, because it encompasses all of what makes Halloween spooky. I used the Rock 'n Roll technique for the pumpkin. It was first stamped in the lighter orange, and then the edges were rocked and rolled around in the darker orange. The card was topped off with a black rose. . .ooo so spooky, hehe."


PumpkinCTnwm.JPG

Ink: SU Pumpkin Spice, SU Tangerine Tango, SU Crumb Cake, and Memento Tuxedo Black
Paper: BG Hello Luscious
Accessories: black felt & black ribbon, orange button, staples, sponge, MFT Rolled Rose Die

Angela has been working with the Build Your Own Paisley set this month and has made some amazing cards.  Check this one out!

"I loved the idea of making the paisley shapes into the petals of a flower. I stamped several in two shades of aqua (Baja Breeze by Stampin' Up!), stamping off on a scrap paper to get the lighter shade. I then masked the petals and stamped the leaves using a Christmas tree stamp from the Oh Christmas Tree set!"

Image

Image

"A pretty button and a sentiment (from the Many Thanks set) stamped on a die cut tag finish off the card!"

Monday, September 5, 2011

Save the Date and Build Your own Paisley!

It's a happy holiday Monday here in the states, but I hope that you're having a great day no matter where you are!  We have more great projects for you today, but before we get to that I want to remind you that we have a design team call going on until September 18th.  Get those entries in!  Just go here for directions.  Good luck!
Cherie is up first today with an adorable layout that was embellished with our Save the Date stamp set. 

"I love these date stamps. I can see them working their way onto many of my scrapbook pages."

Image

Cardstock: Bazzill
Patterned Paper: Simple Stories
Die Cuts: Jillibean Soup
Stamps: Gel-a-tins
Ink: Stampin' Up!
Chipboard: Fancy Pants
Letter Stickers: Lily Bee, Jillibean Soup, Sassafras Lass
Sticker Accent: My Mind's Eye

This thank you card was made by Angela.  She used the Build Your Own Paisley-Floral set to make this one stand out!

Image

"This thank you card was fun to make and very classic looking - paisley is such a classic pattern. Here I was thinking of autumn colours of cranberry, navy and gold. I used the Many Thanks set for the sentiment."


Monday, August 29, 2011

Some color for your Monday!

We have a really cute, summery card for you today from Angela!  I love all the color!

"Another colorful card (I call these "popsicle colors!") using the Many Thanks set and Sewing Kit.

Image

For this card I die cut a notepaper sheet using a die from Papertrey Ink and stamped it for my focal point. I inked the large sentiment assortment stamp with three colors of ink, starting with the lightest, inking different areas of the stamp. Where the inks overlap a new color is formed so I ended up with quite a rainbow effect! I stamped it on an angle and then filled in the white spaces with buttons.

Image

The paper is from Sassafras and I added a little vintage button and some baker's twine for an added touch."


This week Bonnie has given a previous surfing layout an update by adding
the perfect gel-a-tins® touch with our new Surfs Up stamp set. 
I knew thatour Surfs Up stamp set would make the perfect embellishments to
the layout I did a bit ago of DH surfing here in California.
On craft paper I embossed with gel-a-tins® White On and Back in Black embossing
powders. I used pop dots to adhere the surfer to the flowers. I took some natural
twill ribbon and stamped the shell images with StazOn ink in Timber Brown.

Here's a quick thank you card Bonnie made using
gel-a-tins® stamp sets Sheltering Tree & Many Thanks stamp set.

I stamped the tree using images from the Sheltering Tree  stamp set in river rock by stampin' up! and timber brown by stazon. I used the thank you sentiment in purely pomegranate by stampin up! 
as the 'apples' on the tree. Papers are BoBunny and nook & pantry from BasicGrey. 
Cloud buttons were from my stash.


Did you see yesterday's post?  We're looking for some new gel-a-tinas!  Be sure to check it out and submit to be a part of our team!


Wednesday, August 24, 2011

Cards to greet and cards to thank...

Hello again, gelly fans!  I'm back with more card for you today, this time from DT members Angela and Cassie.

Angela is going to start us off with a cute thank you card made with the Button Up and Many Thanks sets!

"So if one layer cards have a layer on top of the card base, then I guess this is a zero layer card! I used the Sewing Kit set, stamping buttons in a grid pattern, and added a round sentiment stamp from the  Many Thanks set to give my card a purpose!
This is a supplies-limited card - no patterned paper used, no embellishments, just a handful of inks (Close to My Heart Smoothie & Honey and Stampin' Up! Mellow Moss) and a card base."


Cassie has another card for us that she made with the Thanksgiving set.

"I decided to make a 5x5 card and to show off that fun turkey from the new Thanksgiving set. How could you eat that adorable little guy?!


Ink: Memento Tuxedo Black, SU Crumb Cake, CDS Turquoise Gem
Paper: parchment, buttercream, SU Dusty Durango, SU dp
Accessories: Copics, Circle & Labels 3 Nestabilities, Open Scallop Die-namics, sponge, brown button, teal ribbon, brown fibers

We don't have much time left for you to get in your projects for our monthly challenge!  Check out the post and enter to win!

Wednesday, August 17, 2011

Cards that are spooky and cards that are sweet!

More fabulous cards to share with you today!  After you check these out, be sure to stop by our Monthly Challenge and head over to the store for our monthly special!
"I tried a neutral look after liking Karin's card so much. "

Image

"This card is really very simple - no fancy techniques so the emphasis stays on the stamps. Paper is Circa 1934 by Cosmo Cricket.
The pumpkin was stamped on textured card stock which gives it a distressed look, and I inked the card stock (which was a creamy yellow) with mustard ink to emphasize the texture."

Image

Gladys made this sweet card with the Button Up set!

"Here I have created a baby onesie using sewing kit! Love the buttons and sewing stitches in the set!"


Supplies
Paper: White stamper cardstock, Echo pattern paper - little girl, OA - 5&Dime
Stamp: Sewing kit from Gelatins
Ink: Versamagic Aquatic Splash, Memento Bamboo Leaves, Grapes Jelly, Lilac Posies
Others: Baby Onesie die from pti, pom pom string, Limitless diecut from pti, 1 3/4" circle punch, Number die, 1" ciricle punch and 1/2" circle punch, blue twine, pink felt, toothpick, clear jewel

Friday, August 12, 2011

Friday Fun!

It's time for more inspiration so let's get to it!  First off, it's a card from Gladys!  She used the Button Up sewing kit to make this cheery card!


DT member Angela used the Happy Halloween set to make this card.  I love that resist technique with embossing powder!

Image

"I did LOTS of heat embossing on this card using White On gelly powder for the ghosts. After they were embossed, I sprayed the cardstock with Graphite Glimmer Mist from Tattered Angels and wiped away the excess. Hint: if you miss a spot or two with the white gelly powder, a white gel or paint pen can be used to fill in the hole after misting.
The background was stamped with the moon stamp from the Halloween set and heat embossed using yummy scented Milk & Honey Gelly Powder. It's a beautiful creamy yellow, a little bit transparent when melted.
The sentiment was inked with pumpkin ink, then I rolled the edges of the stamp in black to give that awesome two-tone look. It was a fun card to make and very Halloween-y to me!"

Image

Friday, August 5, 2011

Feeling like Fall...

Okay, it doesn't actually feel like Fall.  It feels like it just keep getting hotter, but the gel-a-tinas are here to help!  Stay inside, turn on the a/c and check out more great Fall-themed projects to help you think about cooler temperatures and falling leaves.

Cassie made this Fall card with the Giving Thanks set. 

"I was on a roll with this cute set, so I thought I'd make a CAS card with the sweet little images as the main focal points. Of course now I'm hungry for pie, and green bean casserole, and anything made with pumpkin!"

GivingThanksCTnwm.JPG

Ink: Memento Tuxedo Black, SU Crumb Cake
Paper: unknown orange, buttercream, Imaginisce - Apple Cider
Accessories: green gingham ribbon, dimensionals, Copics

Angela used the Happy Halloween set to make this adorable Halloween layout. 


"I had fun making this cute layout featuring my kids dressed as Star Wars characters last Halloween. I stamped the images using different inks and layered it with some fun Cosmo Cricket "Matilda" paper. I stamped the pumpkin and bat on separate cardstock and popped them up with foam tape. For the pumpkin, I first stamped it in grey ink on the page, inking a little grey around it for shadow, then popped it up. Love that big pumpkin image - it makes a great focal point!"


Image

Friday, July 29, 2011

Friday Halloween fun!

Today we have some more great projects to share with you!  I have been having a lot of fun on the net lately, looking at Halloween ideas.  Making treats for three classes worth of kids is something that I have to plan and start early.  Today's projects combine gel-a-tin stamps and easy to find supplies to make treats that you'll love giving away!  First, we have a little something from Karin.
"This little goodie bag I made using a template from Silhouette and cut it out in kraft cardstock. Stamped it with the bats and cob web images from the Halloween set before I glued it together."


Angela made this cute set with a Halloween treat bag and matching card.  Projects like this are perfect for giving to friends and neighbors!

Image

"I love the big pumpkin stamp and I embossed it with black powder and then inked the cardstock with a shimmery orange-red ink. The same ink stamped on a black cardstock was used for the small pumpkins. I embossed the sentiment with White On! Gelly Powder."

Image


Image

"I stamped a little acetate bag with the big pumpkin stamp using Staz-On ink, then I filled it with peanut butter cups."

Image

"I border punched the bag topper with a Kreaxions punch from Just Imagine crafts, then stamped the sentiment and spiders. Love these little spiders!"
Image

"I stamped the bats on grey cardstock and then cut them out and glued them to wire spirals for a fun little detail. What a fun treat to give on Halloween!"