Wednesday, August 8, 2012

It is beginning to look a lot like...

Hello, everyone. It is never too soon to think about the holidays. You can begin by making some simple and cute cards with the Pine stamp from the gelly jrs collection.

Image

This stamp is pretty versatile. You can stamp it once for a small tree...or stamp it multiple times and go as high as you wish! Add some letter stamps spelling out any sentiment you wish. A clean, graphic look that is perfect for anyone.

I embellished the tree with pastel-colored buttons. It creates a soft look. Try adding red for a bold pop, or gold and silver for a sophisticated statement.

This tree design would also be great for a tall tag. A very cute way to label all of those packages you will be wrapping in a couple months.

Thank you for stopping by today. Now you can check "make holidays cards" off your list!
-Kim F.

SUPPLIES:
Gel-a-tins gelly jr's Pine stamp (includes the little star you see at the top of the tree.)

Other:
Letter Stamps by Recollections
Chalk Ink by ColorBox
Cardstock by Prism
Buttons
Zots Adhesive Dots (for the buttons)

Tuesday, August 7, 2012

Fall Kitty

Autumn or Fall if you prefer :) will soon be upon us and that means the ghosts and goblins will be busy getting ready for Halloween!!!!!!!!. But no Halloween would be complete without a spooky little witch's cat. Gel-a-tins have an adorable little addition to your Halloween crafting collection, say hello to Kitty!

Image

Products Used

gel-a-tins gelly jr 'Fall Kitty' stamp
K&Company Halloween Whimsy Collection Paper 12 x 12 Pad
Piece of White Paper
Doodlebug Boutique Ribbon (Halloween)
Xyron 9" Creative Station
Xyron 150 X
Staz-On Ink Pad
Foam Pads
Letraset pro-markers Orange and Purple

How It's Made

Cut the green base and adhere to the card base using the Xyron 9" Creative Station. Trim up the sentiments from the paper and place down the left side using foam pads.

Image

Cut contrasting striped paper and candy corn paper from the pad and run through the Xyron 150 X and place across the front of the card at an angle. Run the ribbon through the Xyron 150 X and cross across the front over the paper strips.

Stamp the gel-a-tins 'Fall Kitty' stamp onto a piece of the candy corn paper and cut out. Run through the Xyron 150 X and place on the card.

Image

Stamp another gel-a-tins 'Fall Kitty' onto a piece of white paper and cut out the hat only, colour with the promarkers and run through the Xyron 150 X and place onto the bottom right corner of the card.

Image

And that's it.

To buy this amazing stamp set please go to http://gelatinstamps.com/ . For more ideas and inspiration you can visit the gel-a-tins blog at http://gelatinstamps.blogspot.ie/ and on Facebook at https://www.facebook.com/gelatinstamps .

Monday, August 6, 2012

The Holdays are Coming!

Happy Monday, everyone! Hope you had a great weekend! Can you believe that the holiday season is around the corner? Have you started to design your holiday cards? Is it too early? Never!

As you have seem before, the design team is highlighting the new gelly jrs. that have been released. There are a number of jrs that would be perfect for holiday cards! You have seen the pine tree before, but possibilities with this one stamp are endless! I love it!

I am in love with kraft and white ink! I think it is a beautiful combination! When I got my hands on the stamp, I knew exactly what I wanted to do!

Here it is:

Image

This card is very simple to create! All I did was stamp the pine image sideways over and over in the stamp of the tree. I started on the bottom and created one row at a time. Once I had the tree created, I stamped a few more images to cover up the holes. I finished the card with a simple sentiment and mounted the cardstock with foam dots to the card.

What do you think? This would make a great card with green ink and adding buttons as ornaments! I might have to give that a try!

Thanks for stopping by today! Please post any Gelatins creations of your own on our Facebook page! We would love to see them!

Jessi

Saturday, August 4, 2012

I {Heart} You

Hey everyone! Welcome to another Gel-à-Tins post!

I'm back today with a quick and simple loved up card - but one that really makes an impact!!

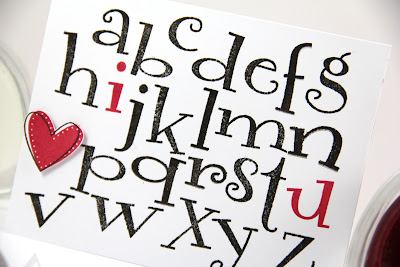
I love alphabet stamps. They are perfect for creating unique sentiments or adding that little extra personal touch. I just adore the Laugh Out loud set from Gel-à-Tins - the font is so fun!! I really wanted to make it the star of the show for this card - and this is the result:

Image

I love how how this turned out!! I've seen similar ideas executed before in blogland but I really wanted to try my hand at it too!

Image

This card couldn't be simpler really. I placed all my letters on one acrylic block, the removed the 'i', 'o' and 'u'. I then stamped the whole block down on a white card base.

Image

I then stamped the 'i' and the 'u' in red ink. I wanted to replace the 'o' with a heart, so I stamped that on a separate piece of cardstock, carefully trimmed out and then adhered with dimensional glue gel - and that's all there is to it!!


Supplies Used:

Gel-à-Tins:
Laugh Out loud Lowercase stamp set

Other:
Simple Valentine stamp set (Papertrey Ink)
Smokey Shadow ink, Pure Poppy ink (Papertrey Ink), Versafine Onyx Black ink, Versamark ink (Tsukineko)
Stamper's Select White cardstock (Papertrey Ink)
Pinflair Glue Gel (Olba)

I'd love to know what you think of this card. Thanks for stopping by!!

Friday, August 3, 2012

A Special Flutterfly

Hello! Hope you've started August off right! We are still enjoying hot summer weather and for us school does not start back up till after the September Long weekend so we are only half way through summer! Today I have a fun summer card featuring a Gelly Jr Stamp, Flutterfly!

Image

Don't the butterflies on this card look like they are flying off? I used some fun paper and took my colors for the butterflies from there, added a fun sentiment and some twine and there you go! A bright fun summery card! Hope summer is treating you right where you are!

Supplies used:

Gel a Tin's Gelly Jr Stamp Flutterfly
Inks: Tangelo by Memento, Bubblegum Pink and Butterball by Hero Arts
PP by Echo Park Hello Summer
Twine by the Twinery
Sentiment from Hero Arts

Thursday, August 2, 2012

Life is Beautiful

Hi dear crafters!
Sweet summer days inspaire me every day)
Today they inspired me for such pretty card with flowers:

Image

Image

First step was to stamp flower on the background.Then I had aged the edge and toned them with ink.
Then I stamped flower again on another pice of paper and cropped each flower.
Made a composition on the card. Decorated each flower with brads. Made the sign and glued it :)
Thats all)

PRODUCTS USED
Gel-a-tins- gelly jrs. Flower
Pion designs paper
Brads Echo Park
Prima Marketing ink
Glossy Accents Ranger


Have a great crafting!
Tanya P.
http://www.diaryofcards.blogspot.com

Wednesday, August 1, 2012

Winter Pines in August!

As July comes to an end, I am happy to report that I have 20 of my holiday cards complete. Here is another one of my easy to create cards that makes it easy duplicate for multiple cards with the same design.

Image

Supplies Used:
gelly jr. Winter Pine
cardstock and ink Stampin' Up
Versamark ink pen

For this card I cut several squares out of white cardstock, then stamped the tree on them. To add a little something to the tree I used a Versamark pen to ink the tops of the tree branches and embossed them with glitter embossing powder to add a little sparkle.

Image

Thanks for stopping by!

Tuesday, July 31, 2012

Snowflake Banner

Hello stampers, Nina here again!

Today I am sharing a easy banner with the snowflake Gelly Jr stamp.
Image

I punched several circles with a 2" circle punch and heat-embossed the snowflakes in white. I machine stitched them together.

Image

Alternatives:
- Use blue cardstock for a more wintry look.
- Just use white ink and let dry.
- Try heat emboss in red (or just red ink) on white cardstock
- Replace the snowflake with any image to suit your theme. (i.e, "doodle flower" for a girl's birthday party; "fall kitty" for Halloween)

It took me about 10 minutes to make the entire banner. I hope that you will give it a try! Happy Crafting!

Monday, July 30, 2012

You are 3!

Hi, everyone! I hope you had a good weekend.

I would like to share a card made with the candy cane stamp from the gelly jr's collection. As you can see, I used the candy cane design in a new way. I used just part of it to create the candles on this birthday cupcake.

Image

To create the candles, stamp the candy cane onto cardstock in 3 colors. Here I used purple, blue, and green. Cut out the straight part of the cane, trimming off the curved hook. Add them to a freehand-cut cupcake, a small tag with a sentiment, and you are done.

Thanks for stopping by. I hope you enjoy all the projects the Gel-a-tinas have in store for you this week!
-Kim

Supplies:
gelly jr's Candy Cane
Carstock by Prism
Patterned Paper by Die Cuts With A View
Letters and Number by American Crafts
Foam Adhesive Squares
Black Pen
Brad and Chipboard Tag Source Unknown

Saturday, July 28, 2012

Love to Laugh

We all have a friend who always makes us laugh when we are feeling down and is always there when we need a pick up. So why not use the new gel-a-tins gelly jr 'Love to Laugh' 2x2 stamp to make them a card as a thank you.

Image

Products Used

gel-a-tins gelly jr 'Love to laugh' 2x2 stamp
docrafts Daisy and Dandeloin Collection (Hawthorn & Bramble) Decoupage
docrafts Daisy and Dandeloin Collection Backing Papers
docrafts Papermania Capsule Collection Designer Die-Cuts
Xyron 9" Creative Station
Xyron 150 X
Xyron Mega Runner
Brown Satin Ribbon
Green Ric Rac Ribbon
Green Polka Dot Ribbon
DCWV Coloured Cardstock
Polka Dot Button
Mini Foam Pads
A5 Card

How It's Done

Line the base of the card with the polka dot paper. Assemble the decoupage image and place on the woodland patterned backing paper and round off the edges, layer onto a piece of DCWV brown cardstock. Run a lenght of green ribbon through the Xyron 150 x and place along the bottom. Use the Xyron Mega Runner to adhere the layer to the card.

Image

Cut the polka dot patterned designer die-cut in half and using the Xyron mega Runner place in the top left and bottom corner of the card.

Using the gel-a-tins gelly jr 'Love to Laugh' 2x2 stamp, stamp onto a 2 1/2" diameter circle of brown DCWV cardstock that had been layered on top of two contrasting green circles, stick together using the Xyron Mega Runner.

Image

Place the sentiment on the bottom right of the card.

On the top left corner stick the polka dot button using the Xyron Mega runner.

Image

Run the ribbon through the Xyron 150 X and adhere to the card along the top and down the left side.

Image

And that's it.

To buy this amazing stamp set please go to http://gelatinstamps.com/ . For more ideas and inspiration you can visit the gel-a-tins blog at http://gelatinstamps.blogspot.ie/ and on Facebook at https://www.facebook.com/gelatinstamps .